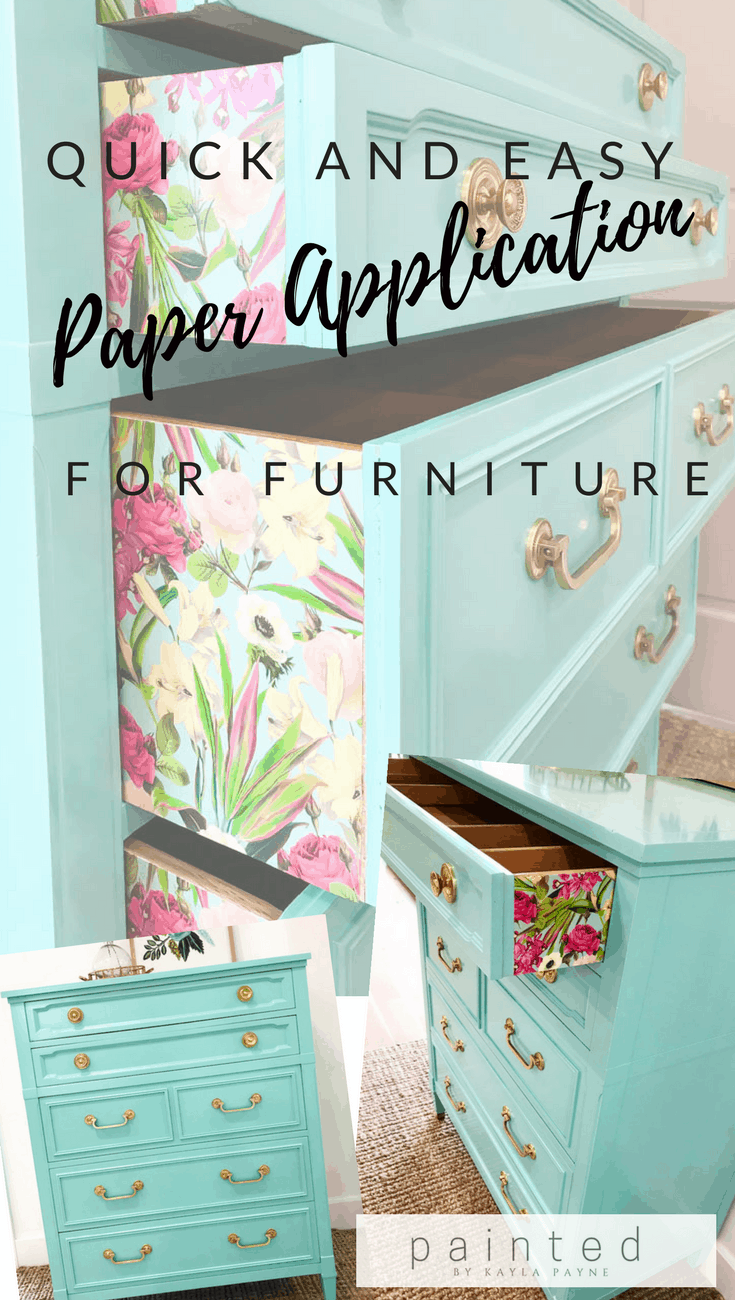
Ready to kick your furniture up a notch? If you’ve ever thought your piece needed a little extra oomph, you’ve come to the right place because I’m going to show you a quick and easy way to apply paper to a dresser for a fun punch of pattern and color.
*This post contains some affiliate links
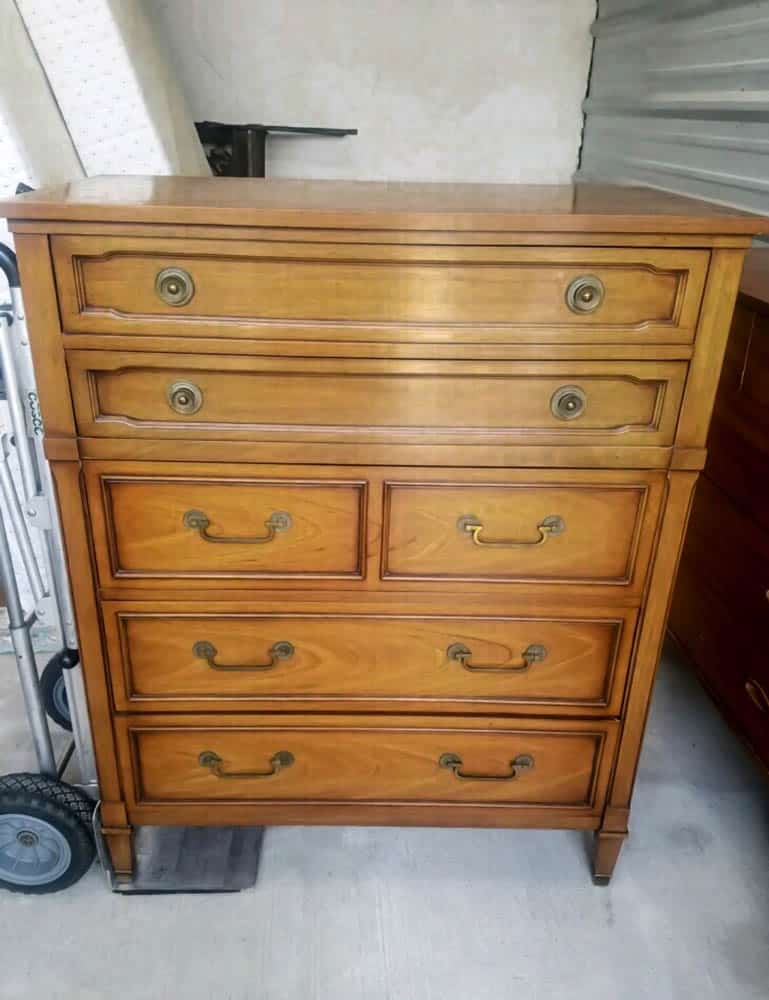
Before I get started on the tutorial, I’ll share some details about this dresser. This Drexel Triune chest of drawers caught my eye because of the gorgeous hardware. Those simple brass pulls are some of my favorites.
I sprayed it in Sherwin Williams Holiday Turquoise in Industrial Enamel with this HVLP gun.
PS If you want to know more about everything I use when painting, you can download your copy of The Glossy Furniture Guide for free! I’ll show you everything I use!
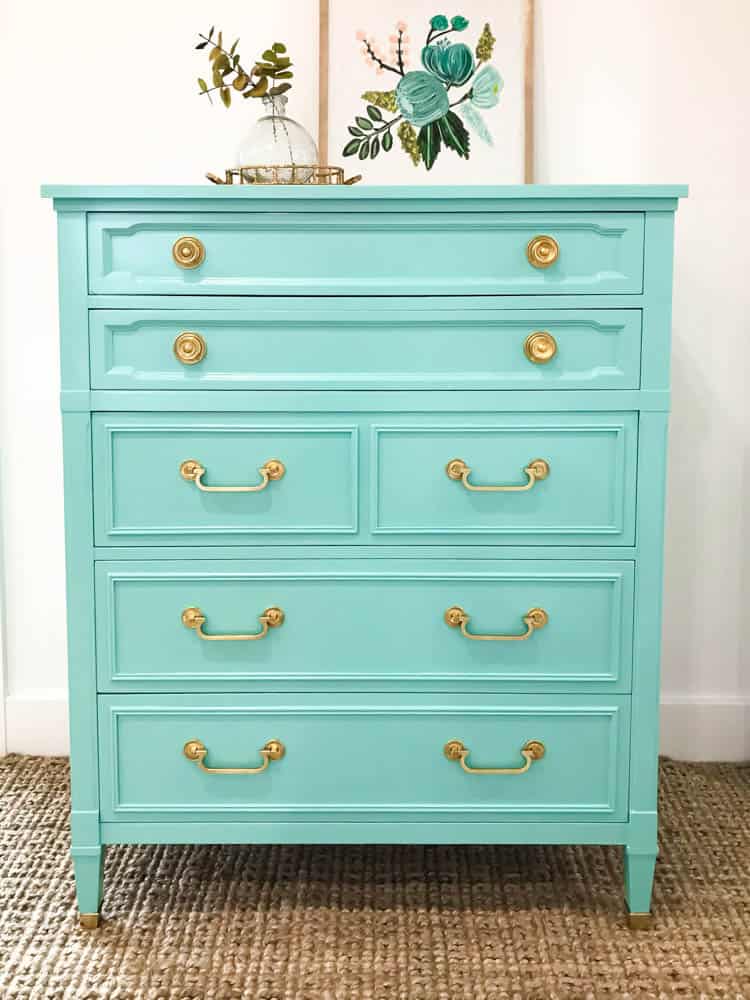
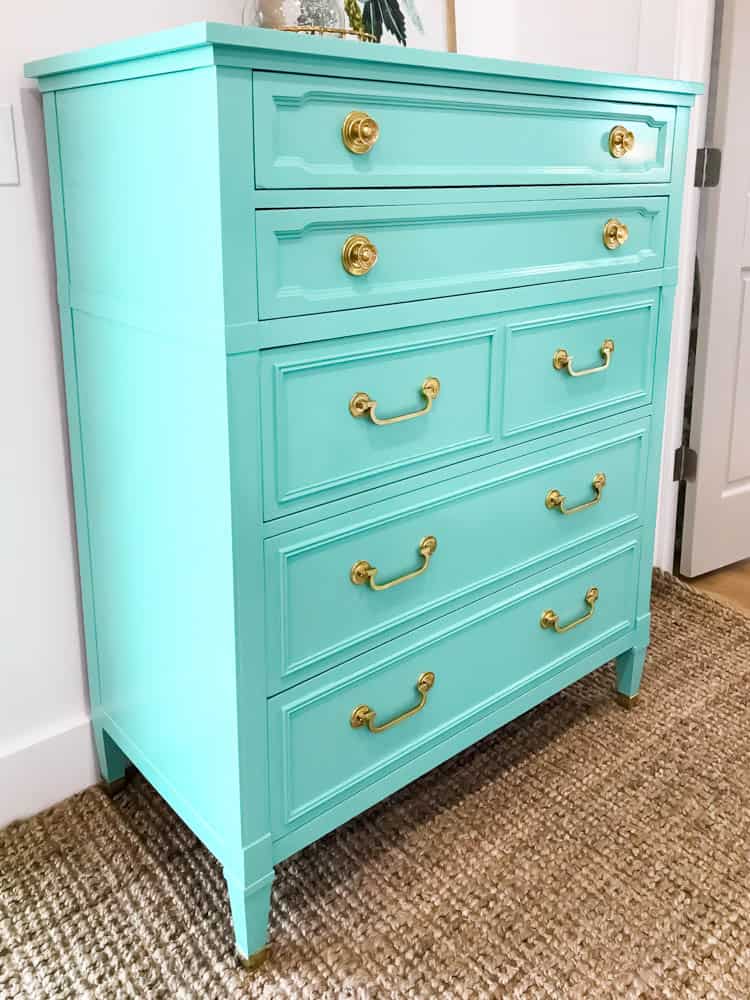
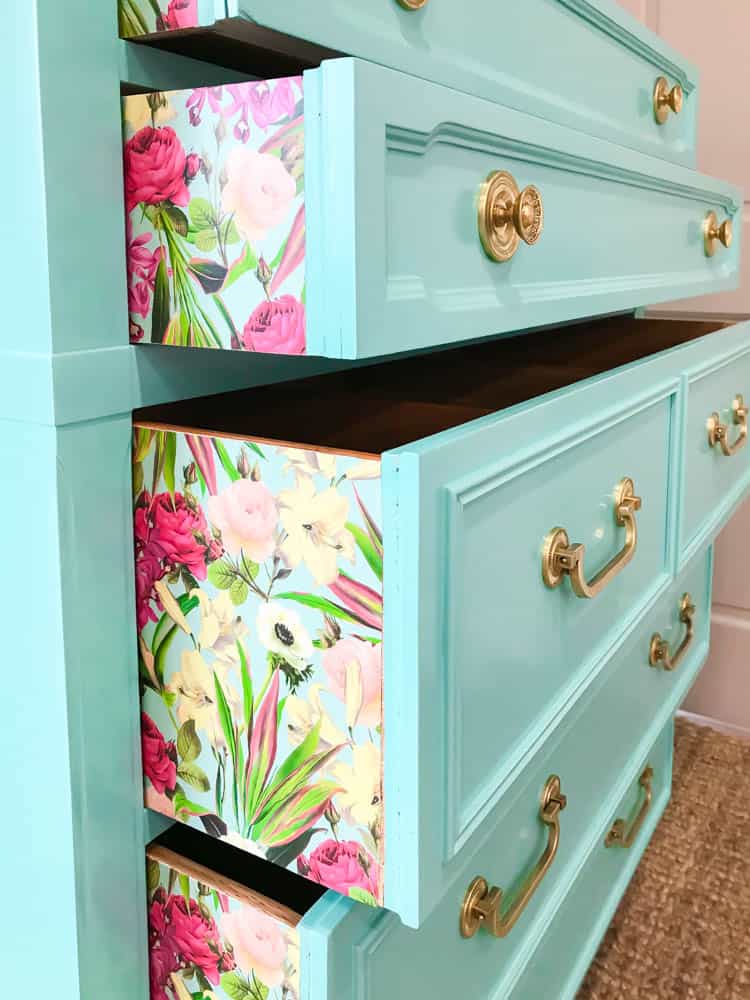
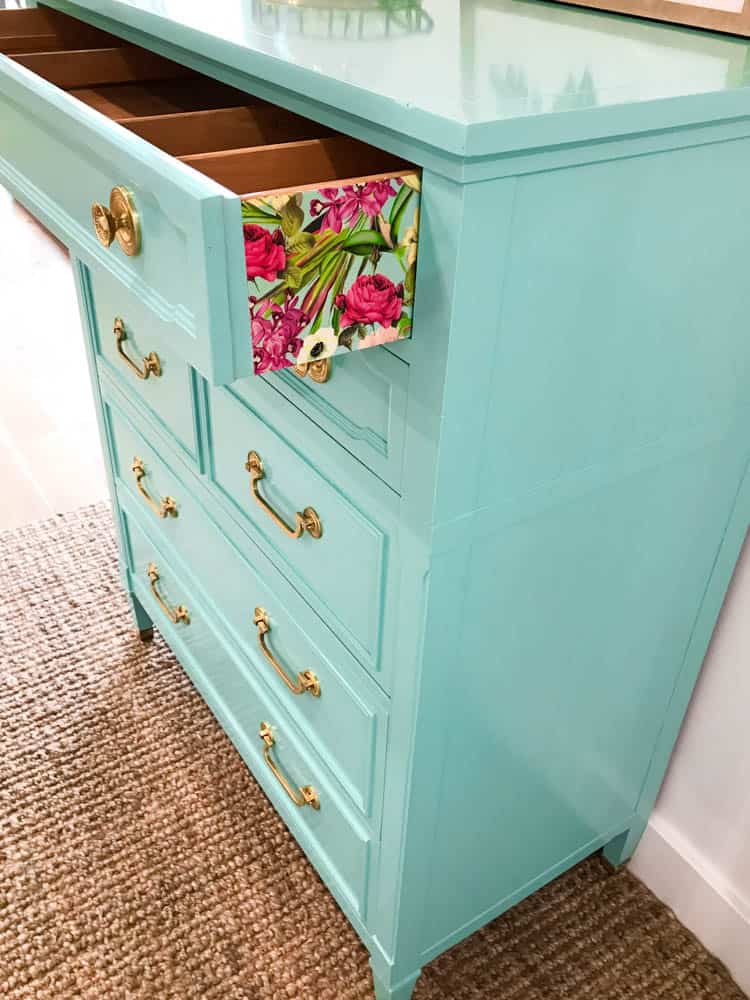
Is that about the cutest dresser you’ve ever seen? The paper matched the paint so perfectly! I bought it from Hobby Lobby. Ok so here’s how I did it.
What you’ll need:
- Paper – Heavy gift wrap or scrapbook paper works the best for this. Most people ask me if this is wallpaper. While you could use wallpaper, it’d be fairly expensive. Gift wrap from Spoonflower or craft paper like what I used here is much more cost effective! *UPDATE: Spoonflower no longer carries gift wrap, but they do have peel and stick wallpaper that works great! All you would need to do is peel it and stick it…no mod podge!*
- Mod Podge
- Razor
- Smoothing tool
- Brush
- Something to put it on:)
What you do:
- I like to roughly measure the surface I’m attaching paper to then cut the paper several inches bigger than needed
- With your brush, apply an extremely thin layer of Mod Podge to the surface. Make sure it’s very thin. If you’ve ever gotten a bubbly disaster when using Mod Podge, chances are you had too much glue! A super thin and evenly brushed layer is the key to no bubbles!
- Starting with one corner, begin attaching the paper to the surface while using your smoothing tool to get it nice and even and bubble free as you slowly put the paper down.
- Using medium pressure, smooth the entire surface until the paper is bubble free and completely adhered.
- Cut the excess paper from the edges with the razor.
- Allow to dry then coat the paper with Mod Podge to seal and protect the surface. Two coats is recommended
- DONE!
I filmed a Facebook Live video of this process a few months ago. If you’re a visual learner, this will be better!
So what do you think, easy enough right? If you haven’t tried this out before, I hope you’re inspired to give it a whirl. A word of caution though, don’t go to Spoonflower unless you have hours to kill because I promise you….it’ll be HOURS!
xo Kayla
Pssst, your Pinterest called, said it wanted this pic…
Linking up to Thrifty Decor Chick!
Hi Kayla, love what u do and the chest of draws looks great, I would like to know more about decoupage and a more detailed way of applying paper napkins to draw fronts or units with out getting wrinkles. Some times it works out fine others not so good, so I would love you to show me how don’t care if you show the rest of your fans just me. Wish I lived closer I’d join some of your classes. Tried a class for another type of intrest I had and no good. You need to be hands on next to the person who is showing you. Don’t work for me on line.i hope u can help but I’ll understand if you can’t many thanks from rainy England cheers Paul watton.
Is there any reason why I should not apply paper on the inside of the drawers? I think it would be pretty 🌺
Thank you!
No reason at all! I’ve done pieces before where I do the inside of the drawers too, it’s gorgeous! Try it sometime soon! xo
The paper may be for lining drawers possibly
Great tutorial! Thanks! But can we puh-leeze talk about those knobs again? How did you get the brass so beautiful!??! I love this dresser!
Hey! Yes I can, I have a post about polishing hardware>>>HERE
I love the color of the dresser you painted! What paint color and brand did you use? Did you use any type of wax to polish it? It looks so smooth and shiny.
Thank you for sharing!
It’s Sherwin Williams Holiday Turquoise in Industrial Enamel. No wax to polish, it’s a glossy oil base paint:) Thanks for your comment xo
What color is the paint you used and brand
Sherwin Williams Holiday Turquoise in Industrial Enamel
Hi Kayla,
Our Spring in Buffalo is taking a little longer than expected. This post brightened by day, and is making me a little more excited for our Clarence Flea Market season! Your talents and easy to use tutorials are perfect! Sharing your post on my real estate website!
Keep shining!
Michele
Michele, thanks so much for your sweet comment!!! xo Kayla
I was wondering what the name of the wallpaper you used was?
Hey Kayla,
Did you ever find out what that roll of paper is really used for? I bought about 4 rolls of the same kind of paper(not the same pattern as yours though) a few weeks ago (there was a great sale on it and couldn’t pass it up), not knowing what the heck I would use it for. You just gave me a great idea, but I would still like to know what that paper is really made for.
thx,
nope! I guess its just drawer liner/craft/wrapping paper! so glad you scored a good deal!! xo
Hello I love the paper on the sides…. do you know the name of it or where to find it?
I don’t know the pattern name but it’s from hobby lobby.
Hi! Kayla, I love what you did to the dresser. The paper is beautiful and I love turquoise. I was wondering if you could use material with Mod Podge instead of craft paper, I would like it to match my drapes in my craft room and have a white dresser? I would use it on the sides of the dresser like you did! The drapes are a teal with black pock a dots on them and my daughter has extra drapery material.
Thanks, Joan
I have the same Drexel piece. It is missing a piece of the beautiful hardware. :-/
Any idea where to find replacements? (Besides hobby lobby). Love hat out did to your’s!!
Hi! How many paper roll did you use for this dresser?
I didn’t even use half of one roll!! There is SO much paper on these particular rolls!! xo
Who leaves their bureau drawers open? What a waste of tome, nobody sees the sides of inside drawers!
Elle, thanks so much for your comment! So kind of you to send your sweet sentiments.
Yours truly,
Tome waster
Opening the drawers would be a sweet little surprise everytime ! I love them ! From another time waster 😘
Ha! Thanks love!
xo
Love the paper. I have alot of time to waste so Im going to try it. 🙂
Love it!!!! 😂
Hahaha I see the sides – it’s for me!
The paper is a great attention to detail that adds lots of pozzazz. Oops, meant “pizzazz.”
😉
Looks great! Do you need to sand the sides of the drawers before adding the paper? I am worried that my drawers wouldn’t shut with the extra layer.
I did lightly sand the drawer sides. If your drawers close tightly already and rub on the sides, then i wouldnt recommend doing this. But if they’re not already rubbing, you should be fine! xo Kayla
The mirror-like finish on this piece, as well as every other high gloss piece you’ve done, is flawless and absolutely beautiful!!!! What you do is truly a work of art. Those people that feel the need to post negativity and spew hatefulness obviously have nothing better to do with their “tome” than to criticize the work of others who spend theirs creating such magnificent pieces! And then THEY have the nerve to call YOU the “tome waster”???? 🤣 The other 99.9% of us adore your work and look forward to each and every new piece of eye candy that you delight us with!!!!! Keep ’em coming, Kayla!!!! Nothin’ but love and respect from this Southern gal….your neighbor in the South.
How long should it dry before the top coat?? I LOVE this !! Lining a sentimental piece with paper written in cursive about memories and generations!!! Thanks.
I just let it dry for a few hours before top coating! xo
I am painting the cabinets in my camper van a pale turquoise and now, thanks to your gorgeous dresser, I’ll be covering the sides of the drawers as well! I love it! Oh my gosh, I just had an idea, I’m going to use road maps!!! How cute will that be!! Thanks for the awesome idea!
Stunning transformation! We’ve been restoring and refreshing antique and used furniture for years and it’s always great to see new ideas! Thanks for sharing. Carolina at Hamilton Billiards.
Hi just wanted to give you a quick heads up and let you know a few of the images
aren’t loading correctly. I’m not sure why but I think its a linking issue.
I’ve tried it in two different browsers and both show
the same results.
thank you for this wonderful post. i papered the sides of a piece of furniture, that my cousin and i painted, according to your directions. i used thick paper of pandas that i purchased at blicks. my granddaughter just keeps hugging the drawers.
my cousin, lynn, will be posting a photo of the finished dresser on facebook (shabby but so pretty) with giving you full credit for the idea.
again, thank you.
sharon
When you purchase paper from Spoonflower for drawers etc are you referring to the pre-pasted wallpaper? I don’t see a gift paper option.
So, spoonflower recently got rid of their giftwrap! Sooo sad! But you can get the peel and stick wallpaper to do the same effect! Best of luck:) xo
Saved as a favorite, I love your web site!