Some people might think china cabinets are nothing but an outdated furnishing of the past, but I couldn’t disagree more. Whether it’s richly stained wood or brightly painted, a china cabinet with clean, traditional lines can still be an asset to any interior. In this post, I’ll show you my latest china cabinet makeover before and after. Is this piece boring and outdated? You be the judge!
The Before
I found this china cabinet on Facebook Marketplace for $100. The owner had stored it in her backyard shed for the past couple years. The shed wasn’t very weather proofed, so I was surprised to see the cabinet still in good condition.
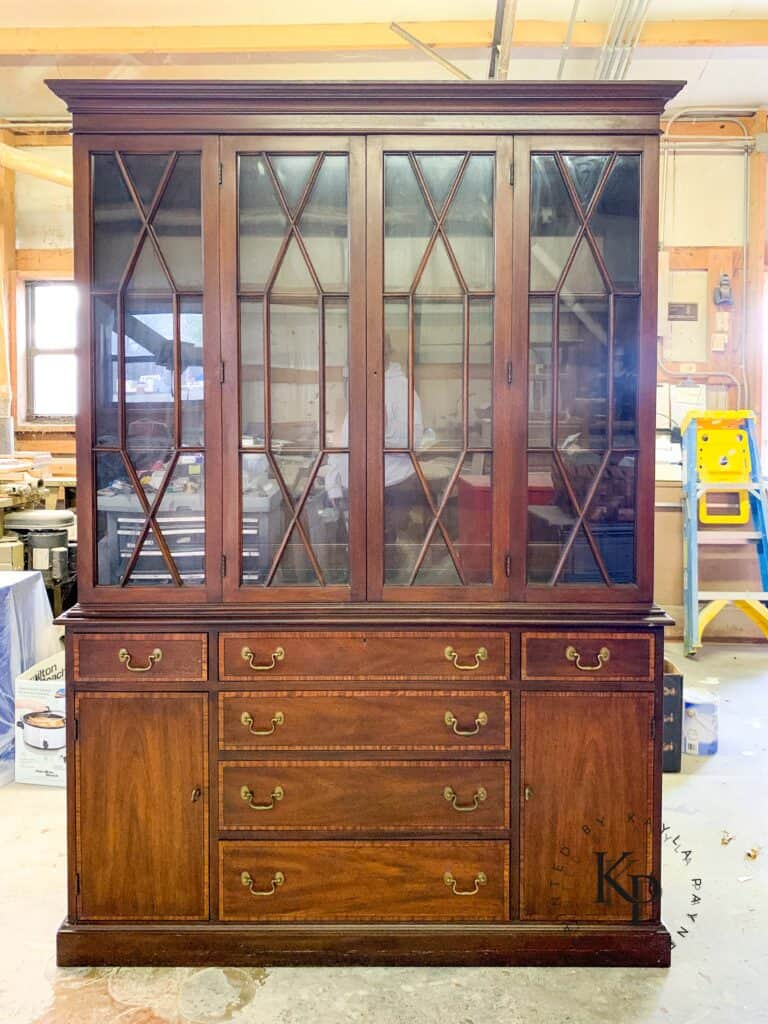
Once I got it unloaded at my shop, I realized it was made by Henkel Harris. While this china cabinet is heirloom quality and very well made, it is not a one-of-a-kind antique. This cabinet was likely produced in the 1980’s, maybe even the early 90’s. There’s no doubt the Mahogany wood and veneer is absolutely beautiful! But I chose to paint it anyway. I’ve painted furniture for quite a few years now, and I know how controversial it can be! So, if you’re going to choose to be offended by this beautiful wood being covered up by paint, you can simply stop reading right now. There are many non-painted china cabinets left for you to purchase and save them from folks like me:) (And if you’re into reading internet drama over painted furniture, scroll through the comment section of this video I put on FB!)
Now that that’s out of the way, let’s move on to this high gloss china cabinet makeover before and after.
Watch The Before & After Video
Want to skip the reading and watch a video instead? Watch this video on my YouTube channel! Don’t forget to hit the subscribe button:)

The Plan
If you’re maybe new to me or my blog, you might not know that I am sort of a one trick pony 😂 I paint furniture in high gloss, and that’s pretty much it. I love the look of shiny paint on furniture. And apparently I also love the intense challenge of getting gloss paint to look good. Because it is for sure a challenge.
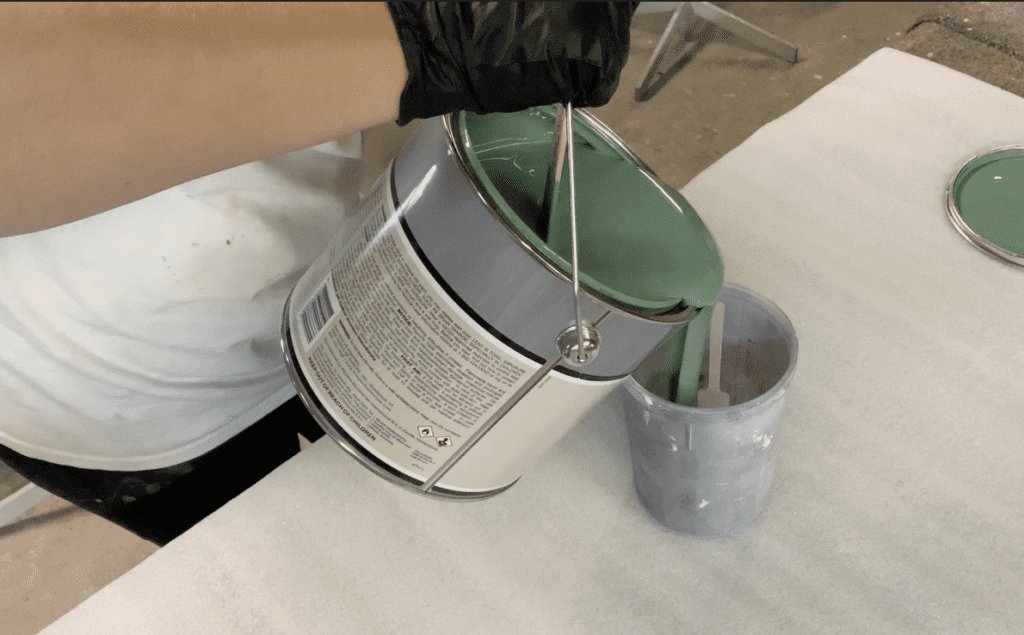
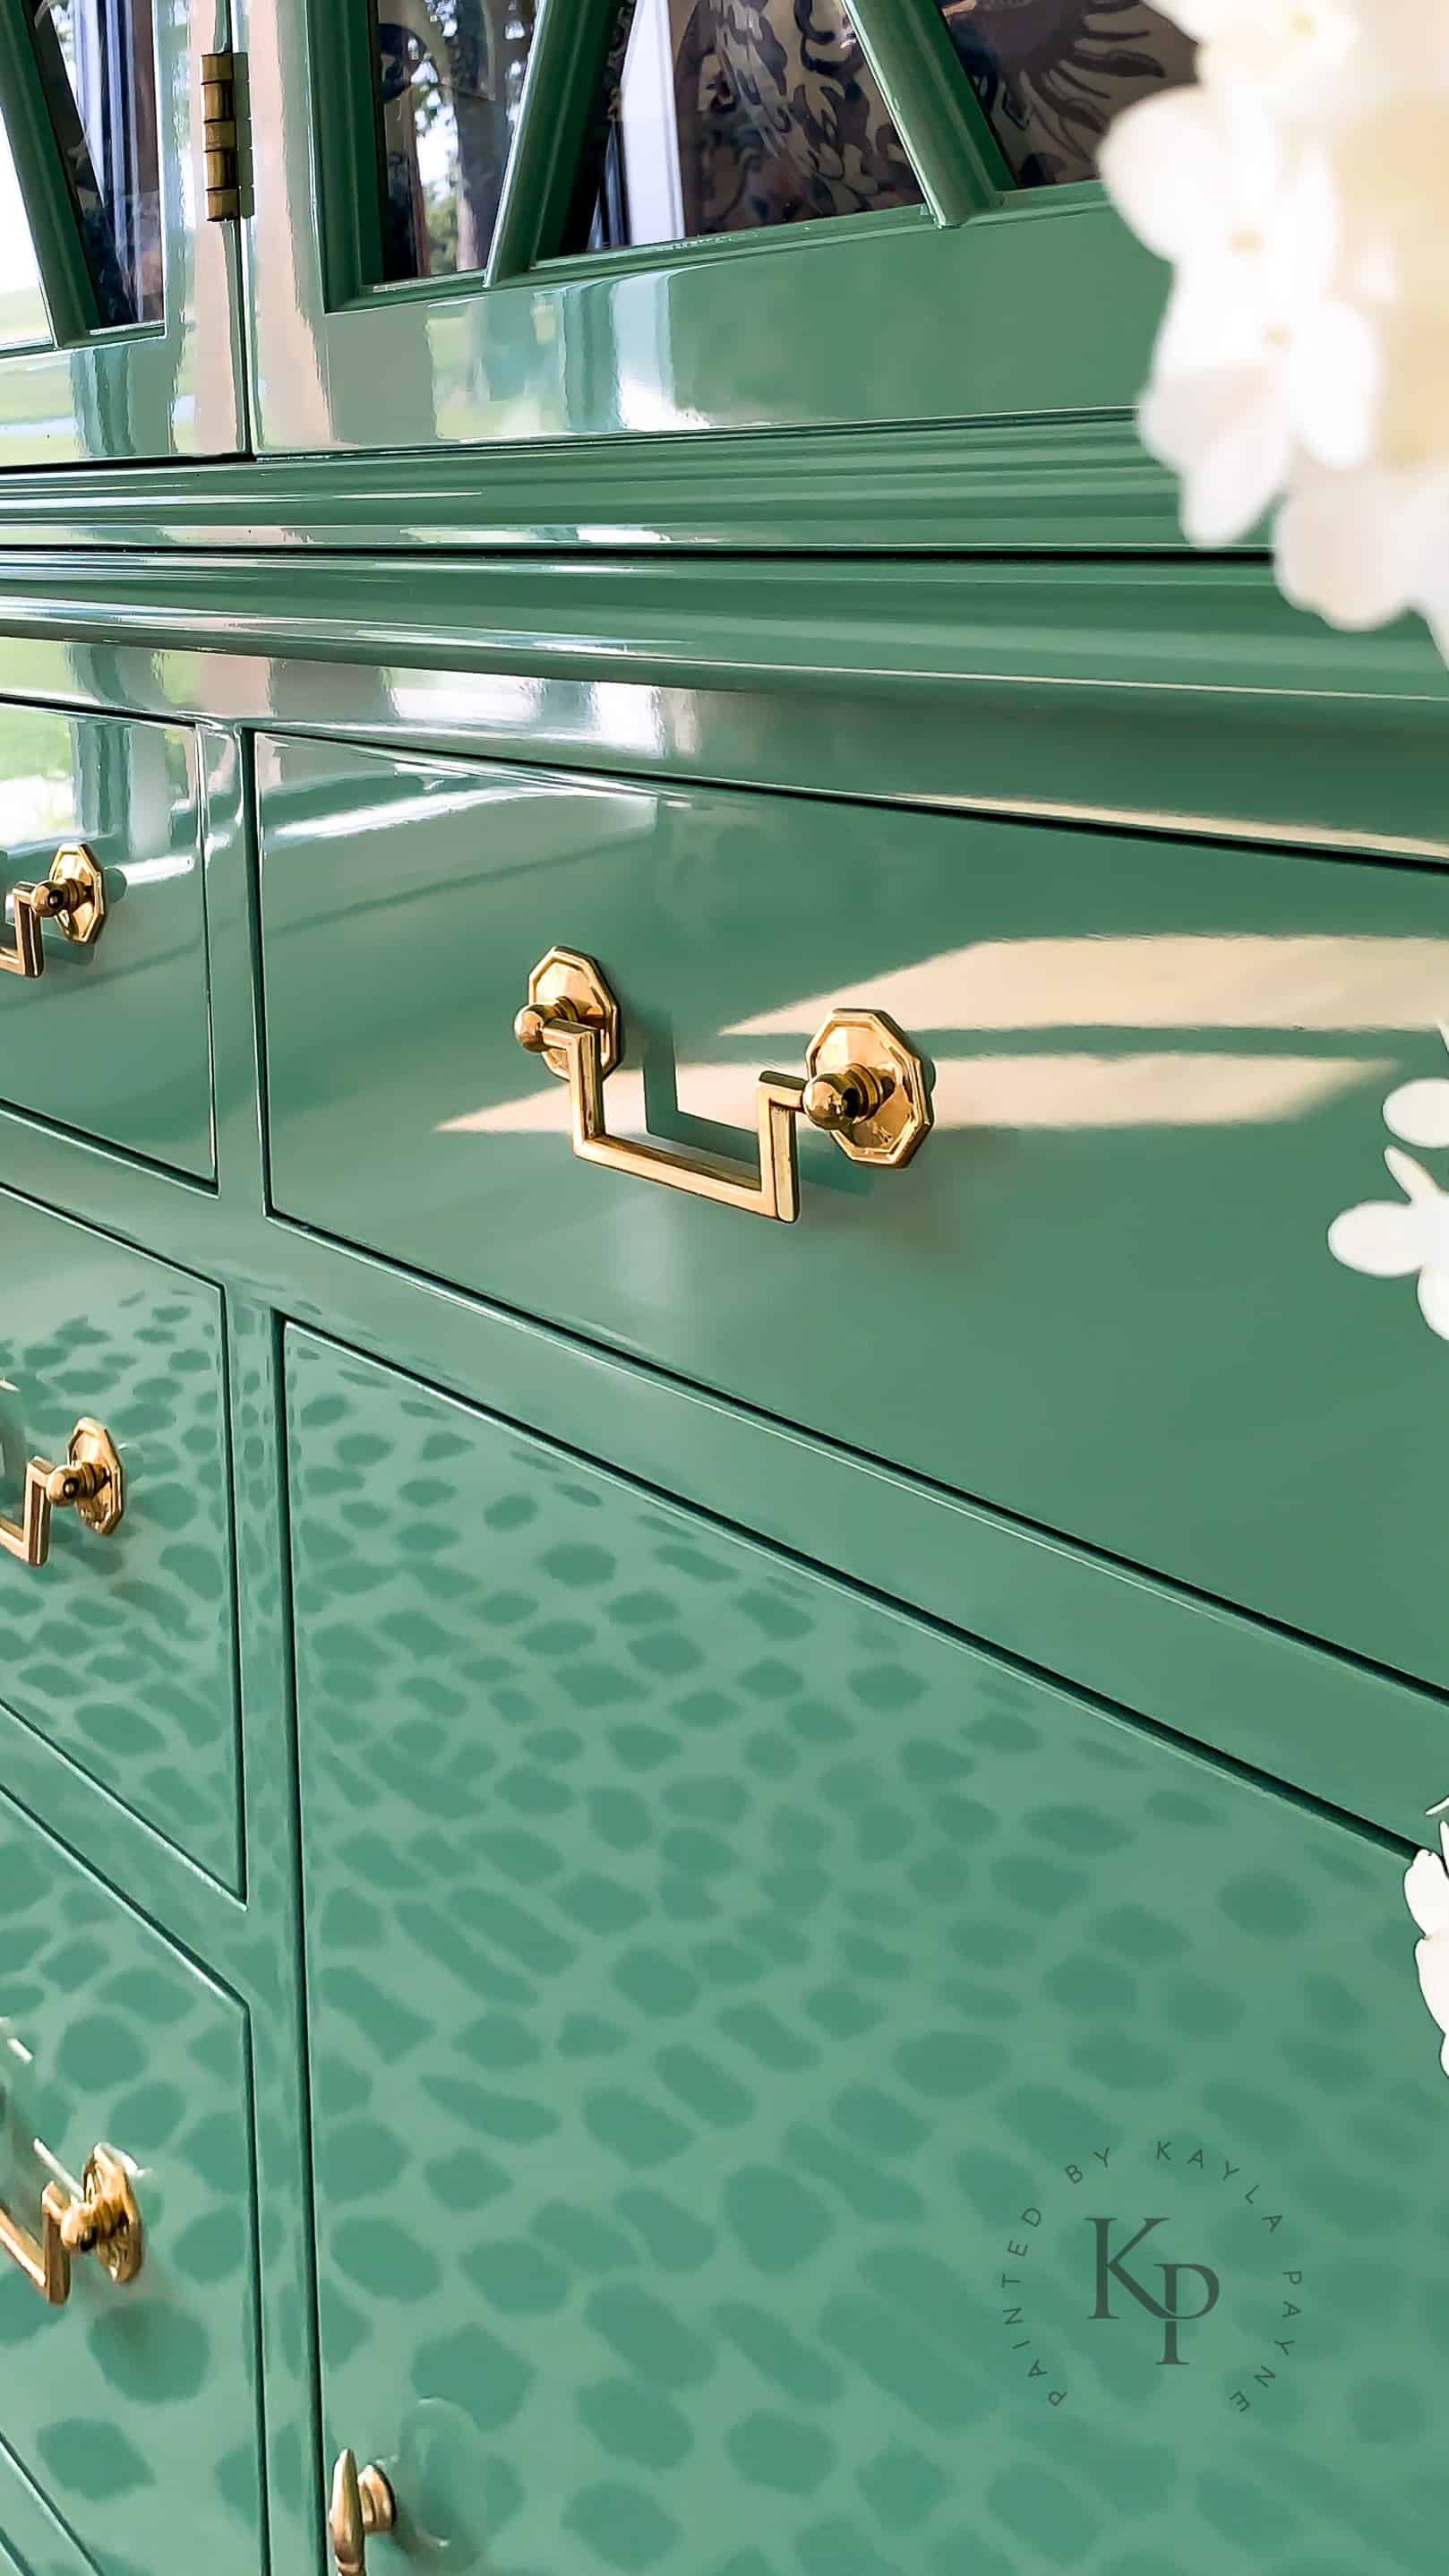
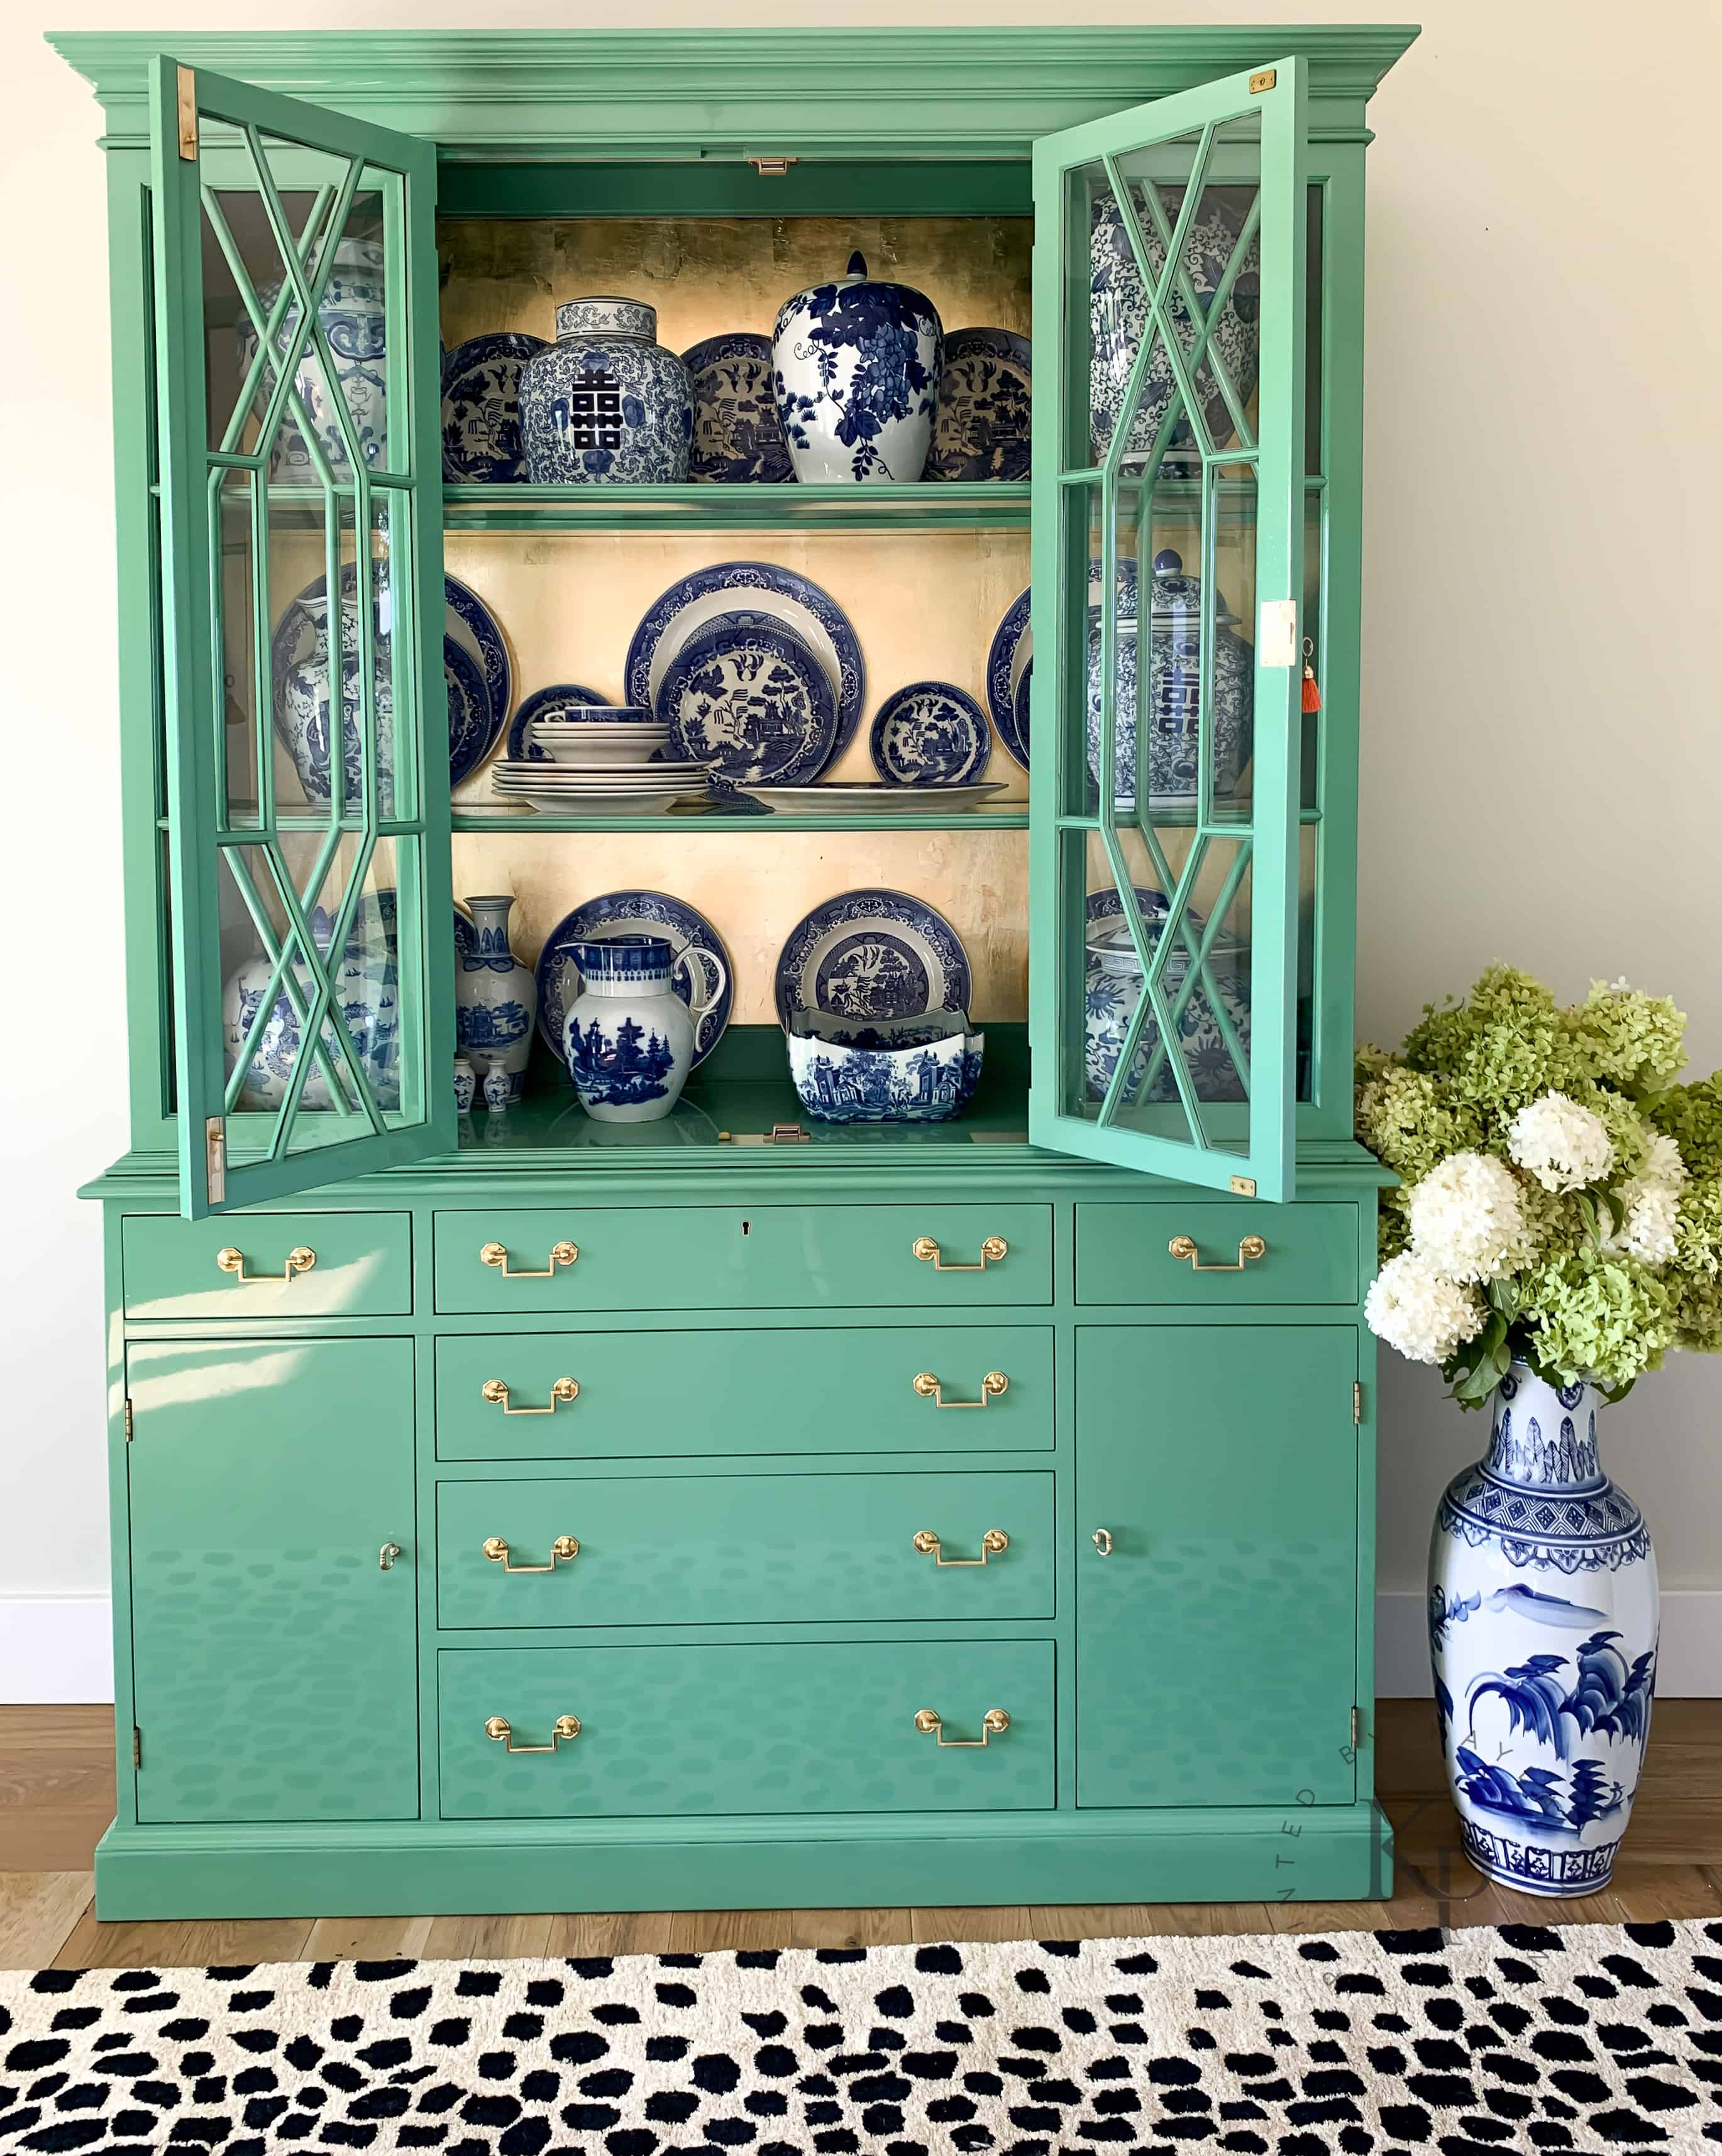
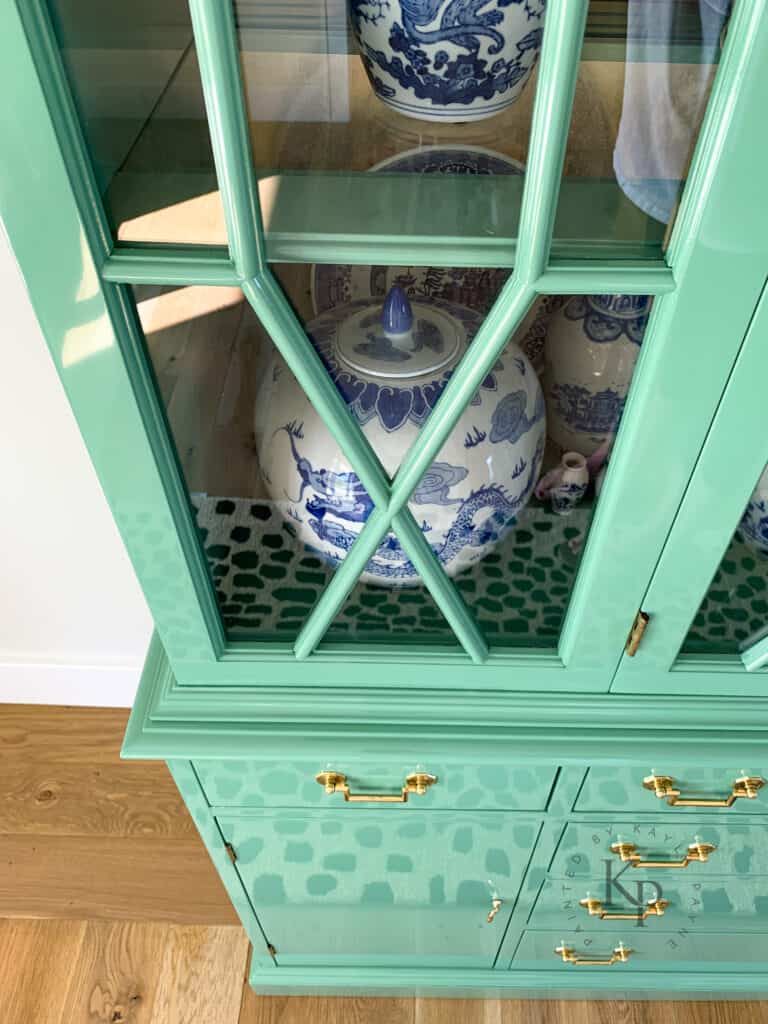
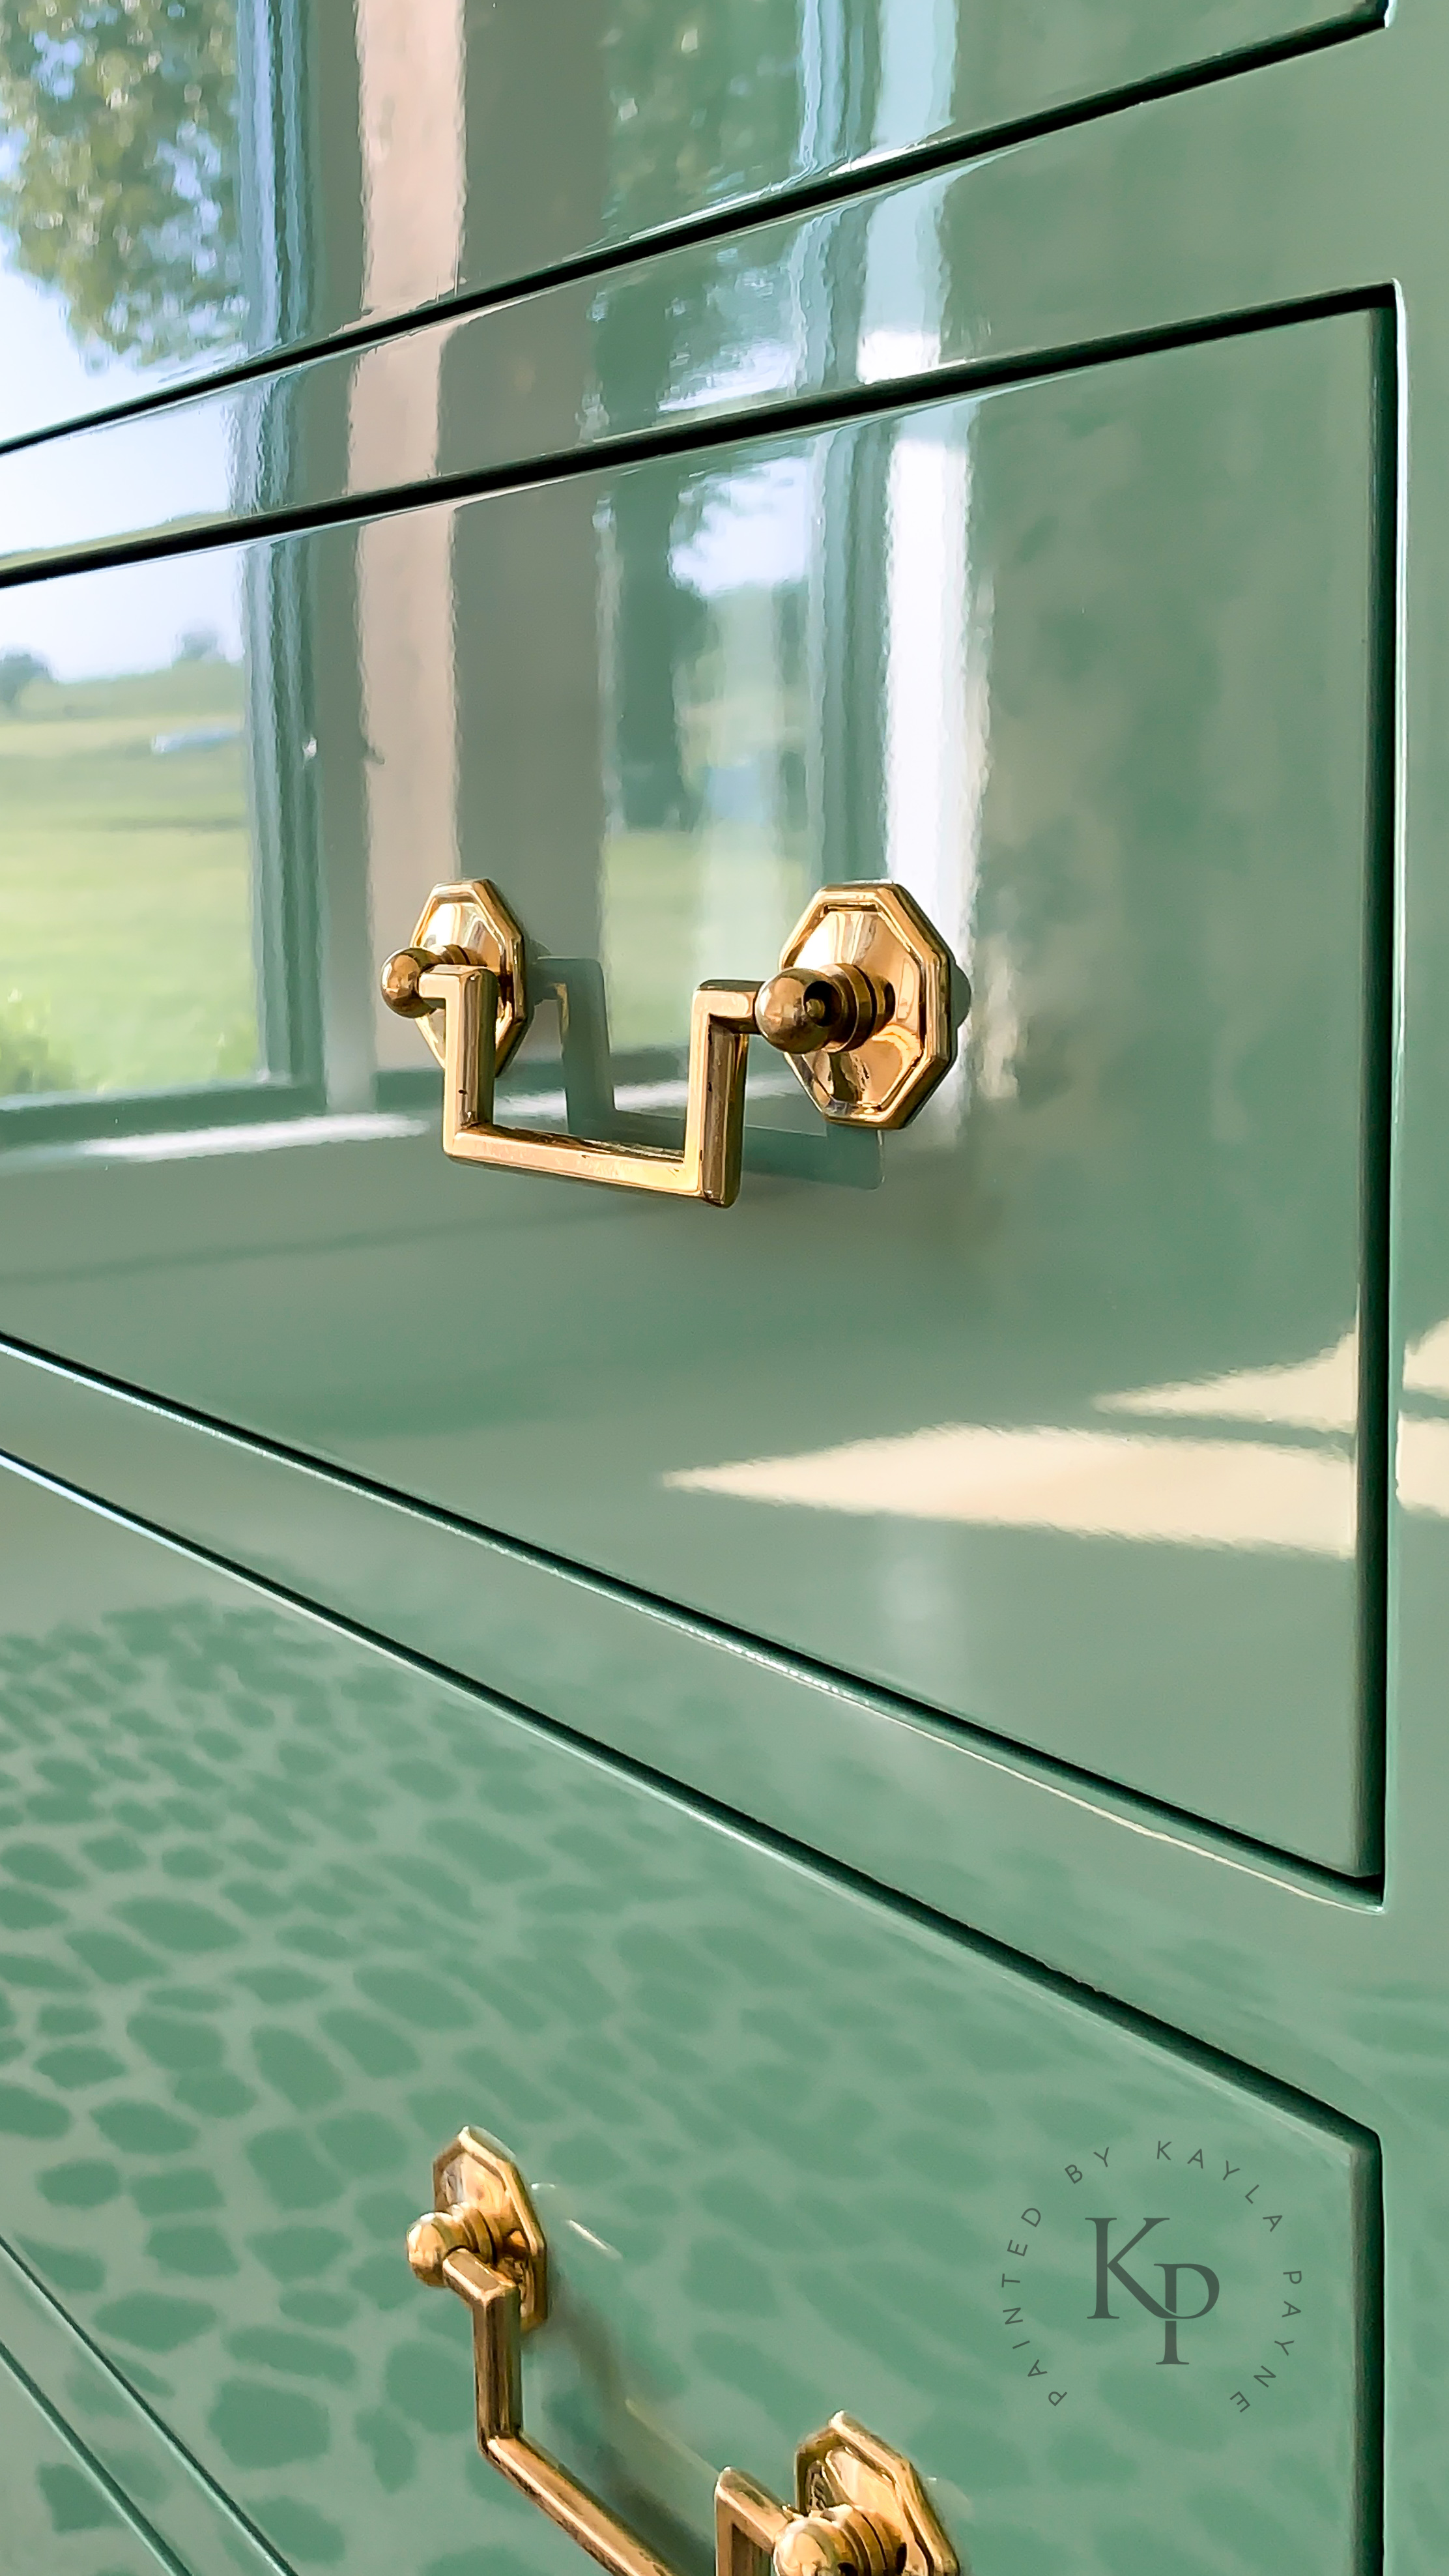
With this cabinet, I felt like a shade of green “fit”. I used color code G20010 by Fine Paints of Europe (the color is very similar to Sherwin Williams Grandview for comparison sake)
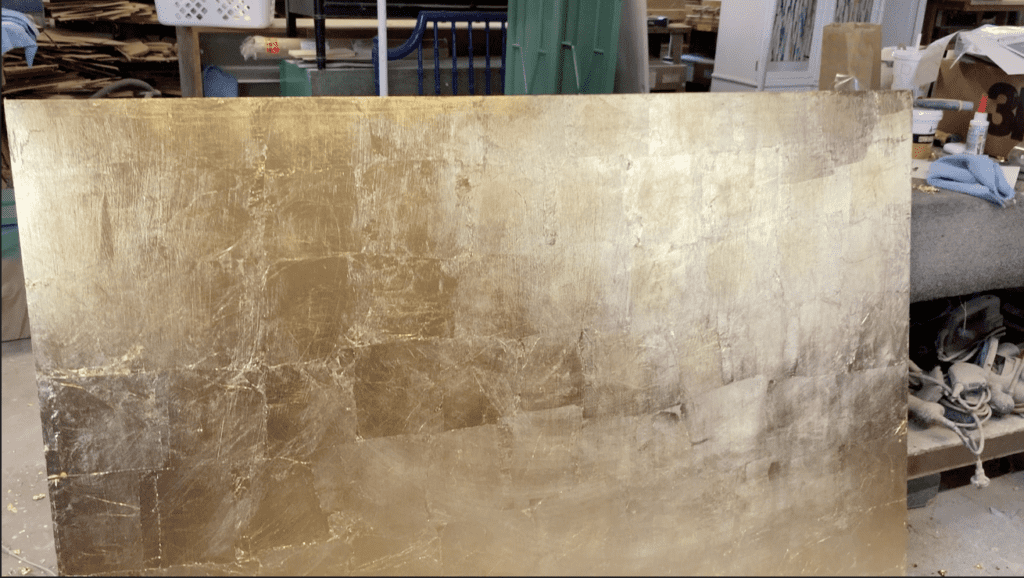
What goes better with green than gold? That’s why I decided to gold leaf the back of the interior.
Here’s how it went down.
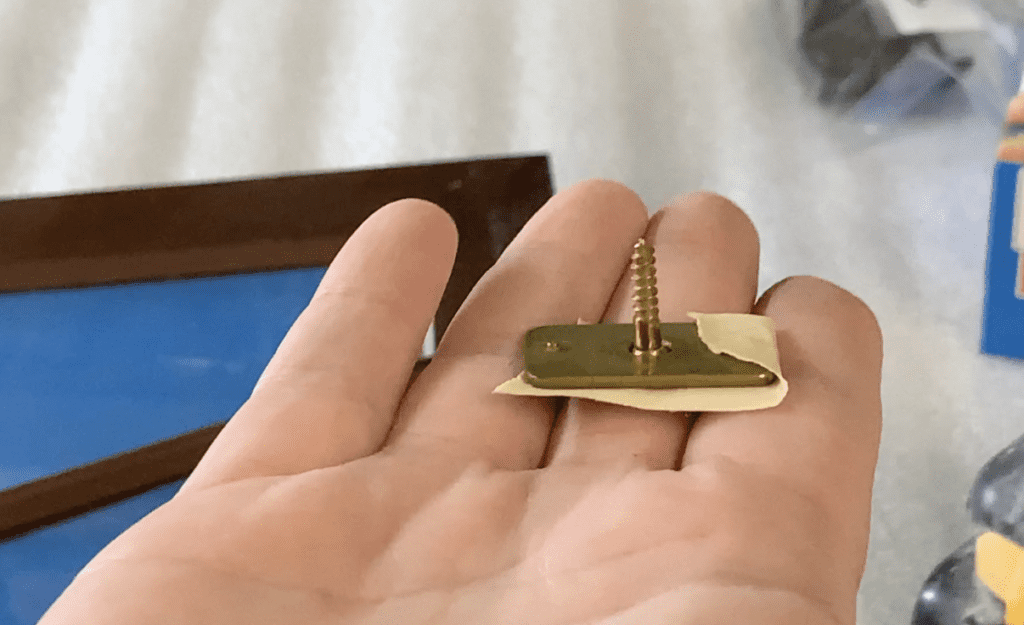
First: Disassembly
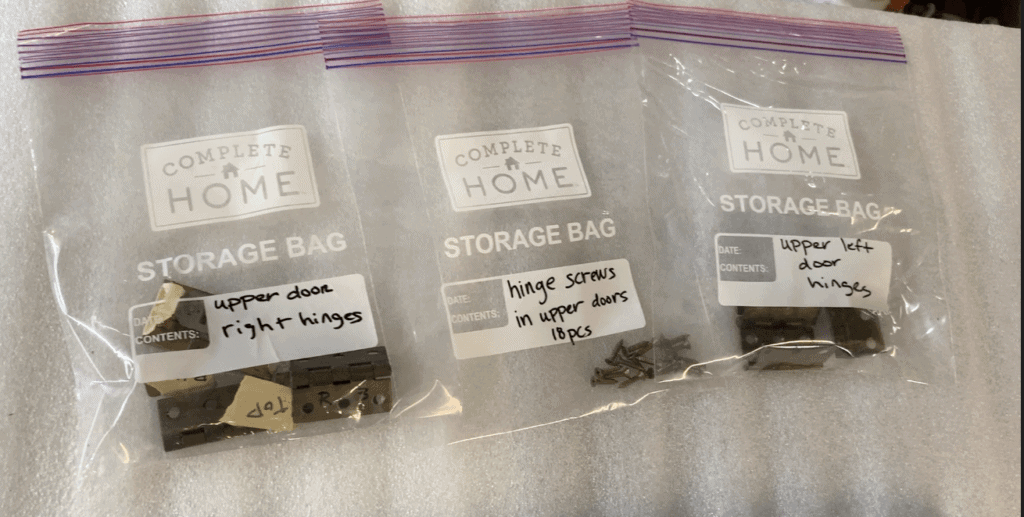
To begin with, I labeled every screw, hinge, door and drawer location then disassembled the entire cabinet. I’ve learned the hard way – take the time to label every dang screw! I like to remove the hinges from the body, put the screws into the hinge holes, wrap a piece of tape around the hinge and screws then put into a ziplock bag with the location written on it, like below.
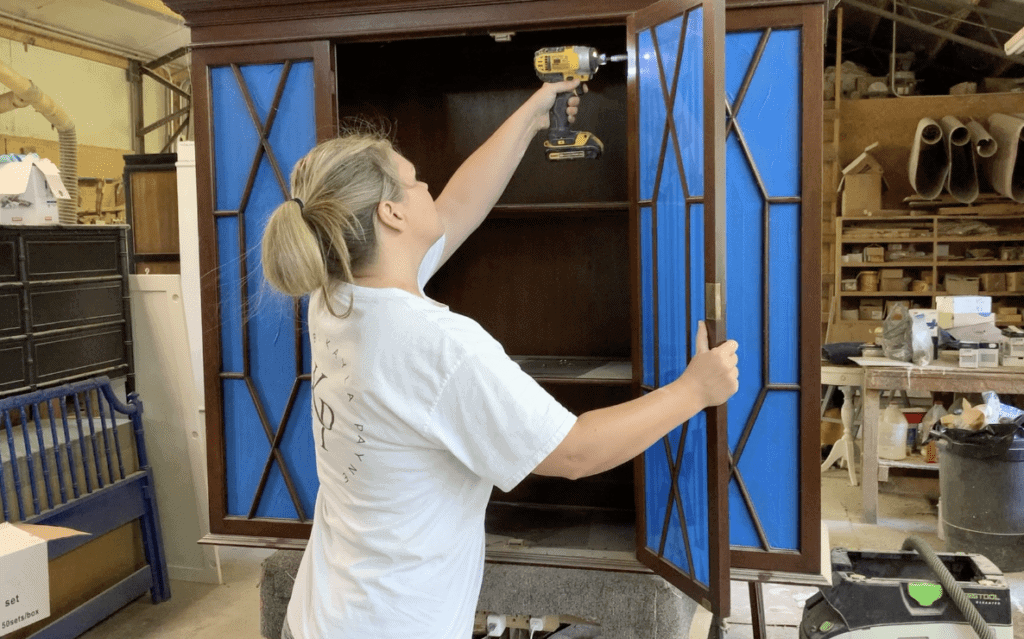
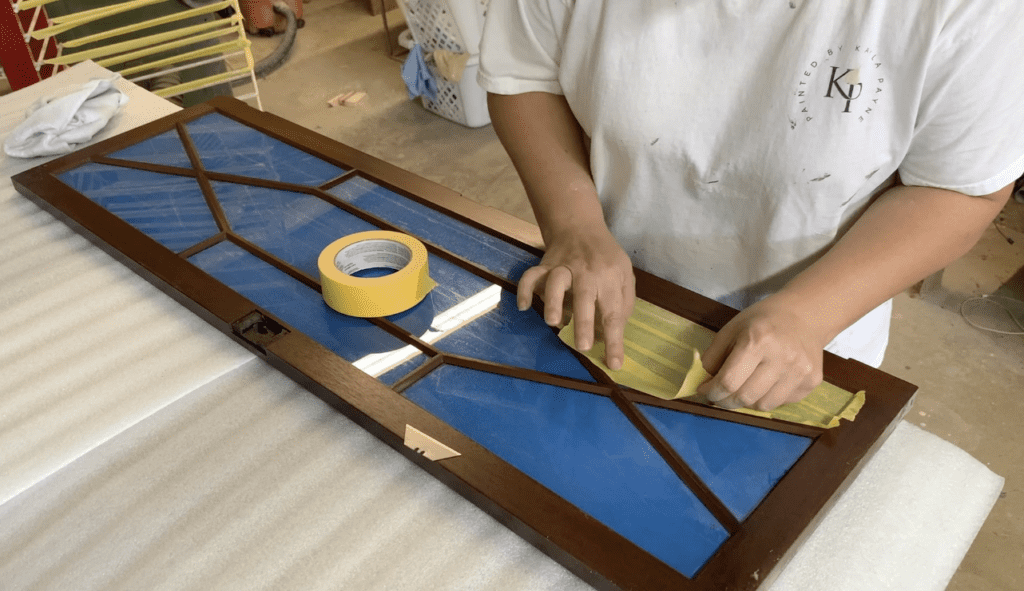
I used painters tape to tape off the glass. This glass was glazed into the mullions which made them impossible to remove!
Second: Cleaning and Initial Sanding
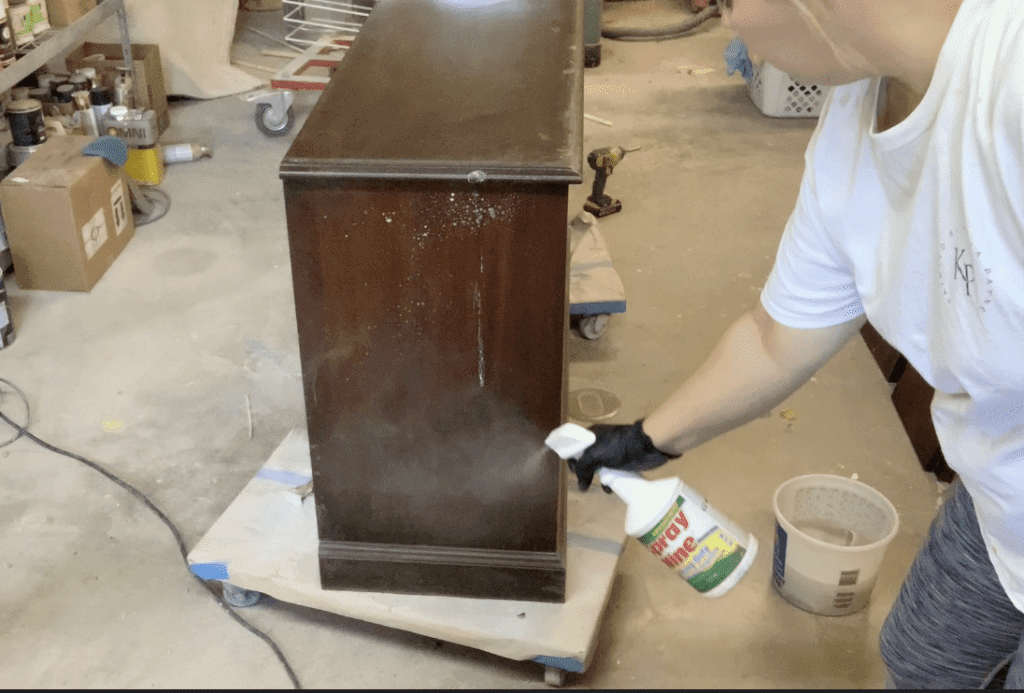
Once the china cabinet was fully disassembled, I used TSP and Spray Nine degreaser to clean the entire cabinet inside and out. Do you have to clean wood before sanding? Yes you do. Unless the wood is brand new, unfinished/raw, it must first be cleaned before it’s sanded. If you don’t clean before sanding, all you do is grind the dirt and grease into the wood pores.
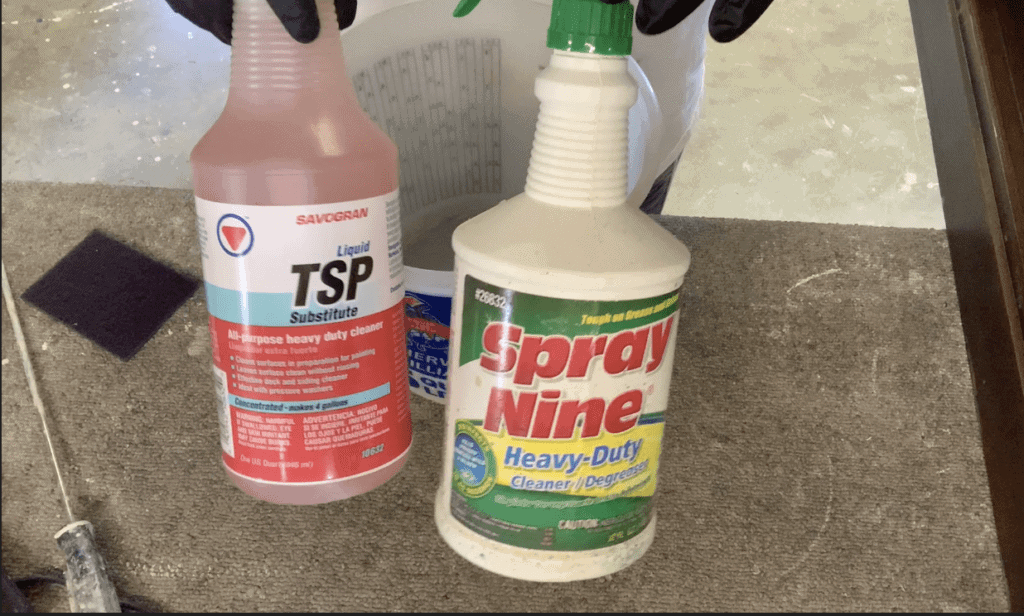
I diluted the TSP into hot tap water according to the directions on the bottle and used a microfiber cloth to wash down the surface. And Spray Nine degreaser is great to cut through years of grime.
Once the wood was squeaky clean, I used my Festool RTS sander with 120 grit sandpaper to sand the flat surfaces. For the curved and hard-to-reach areas, I hand sanded with a folded piece of sandpaper.
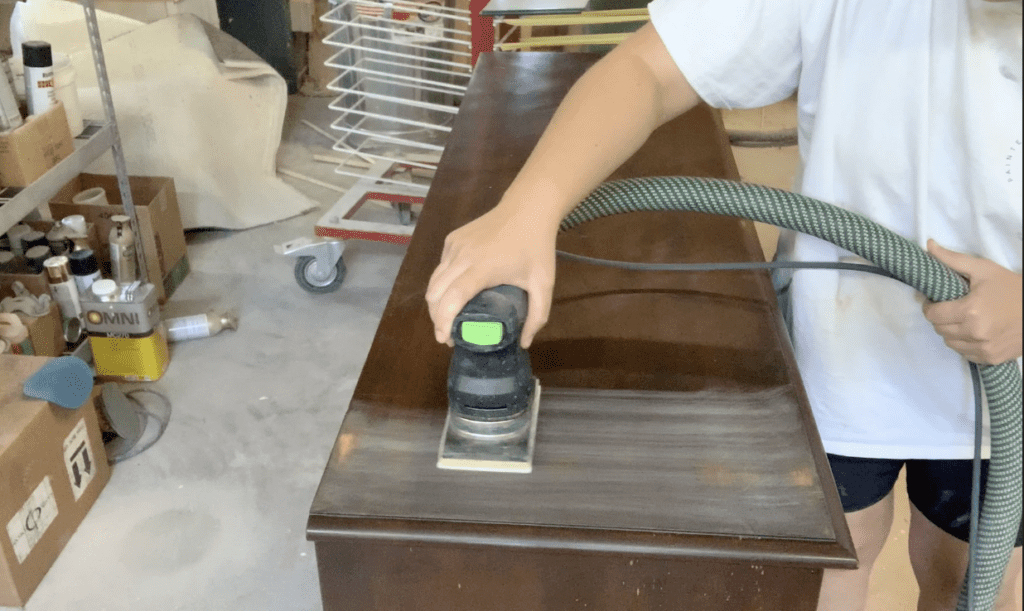
How To Know When You’ve Sanded Enough?
When sanding an existing wood finish in preparation for paint, it’s usually enough to take off the sheen of the finish. You want to sand until you see a uniformly dull and flat surface, this means that you’ve removed/roughed up the old clear coat enough that your primer will have enough tooth to adhere to.
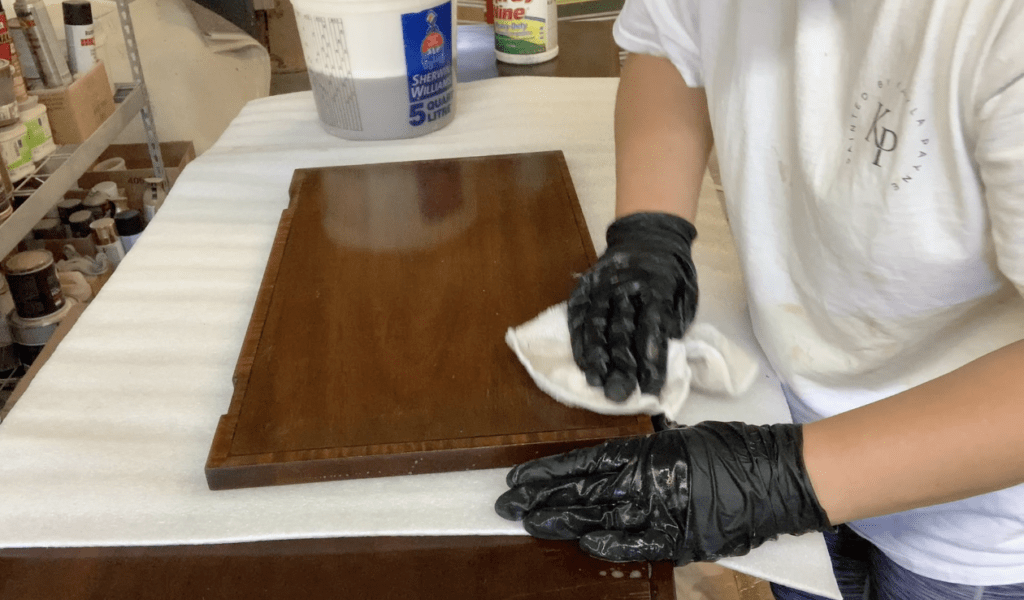
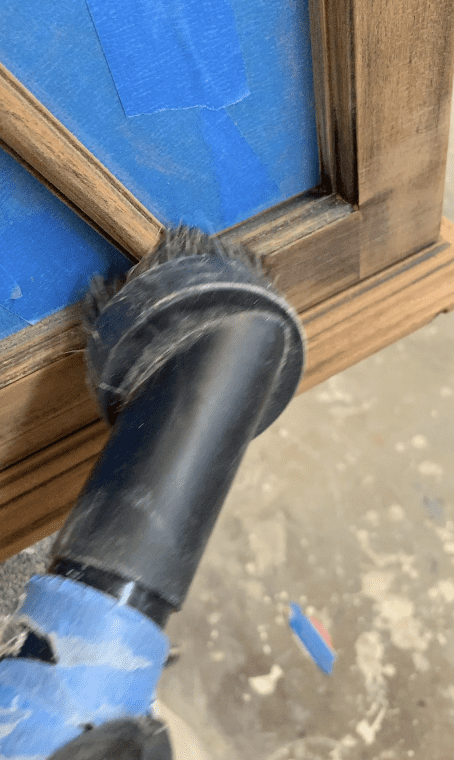
After I sanded the original finish, I vacuumed all the dust up using a horse hair brush attachment on my dust extractor. Then dusted the surface with a dry microfiber cloth.
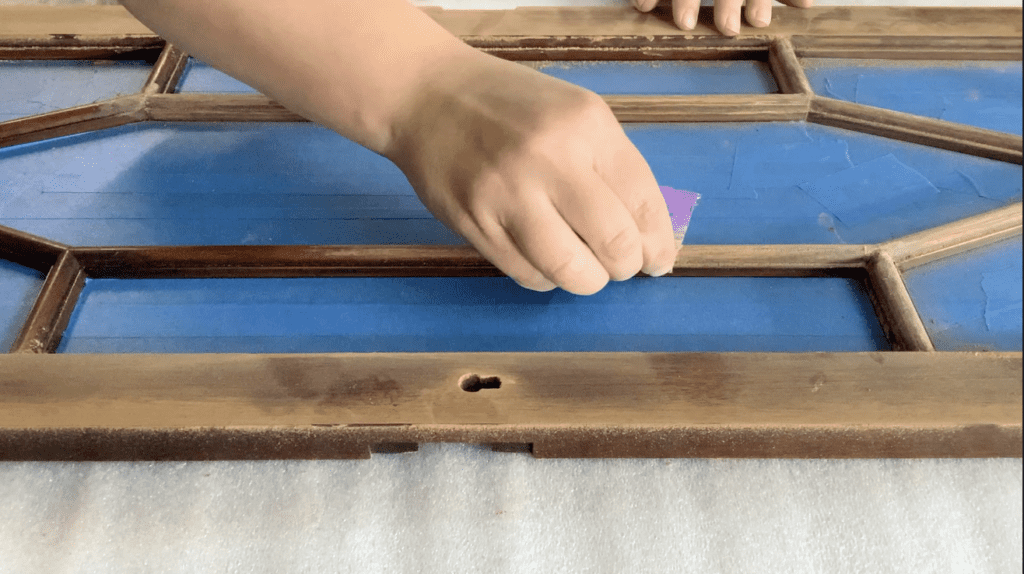
Third: Brushing Putty and Block Sanding
After the initial sanding was complete, I brushed on a layer of Fine Paints of Europe Brushing Putty. This oil base product acts as several layers of primer. It helped fill the open wood pores/grain and helped build up some low areas in the wood.
Once the brushing putty dried overnight, I used 220 grit sandpaper on my sanding block and block sanded the cabinet. The splotchy and uneven look of the brushing putty after sanding is normal. Where the white brushing putty was left indicates a low area in the wood. Where the wood is showing indicates a high spot in the wood since the brushing putty was sanded off.
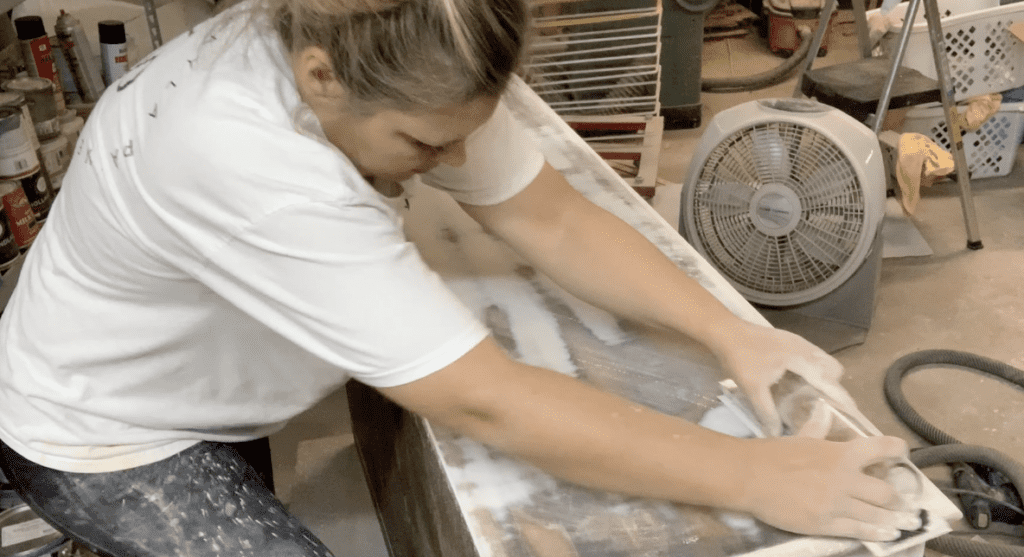
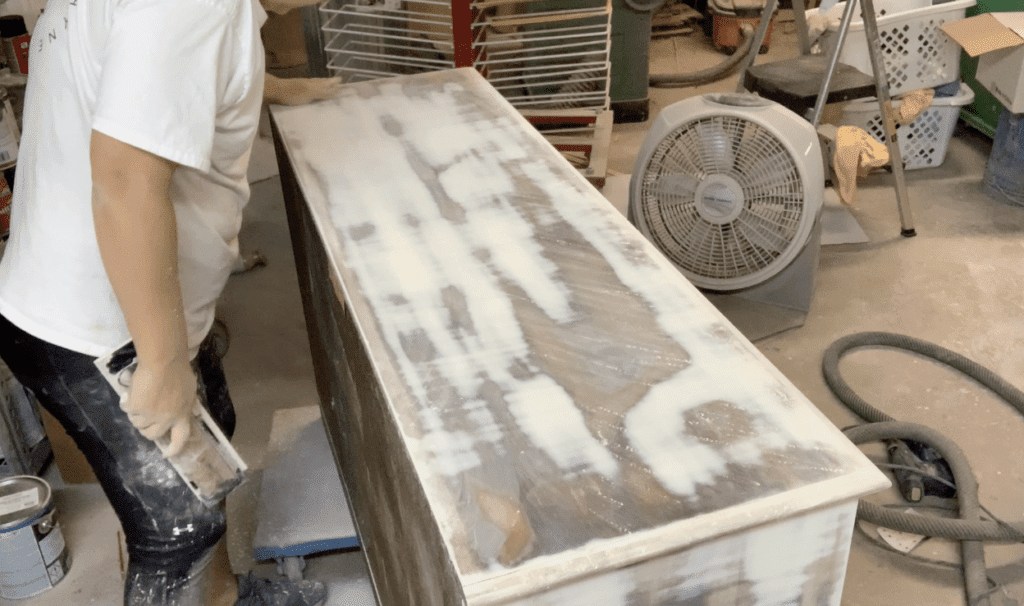
After block sanding (aka blocking) the Brushing Putty, I vacuumed and wiped the cabinet down again.
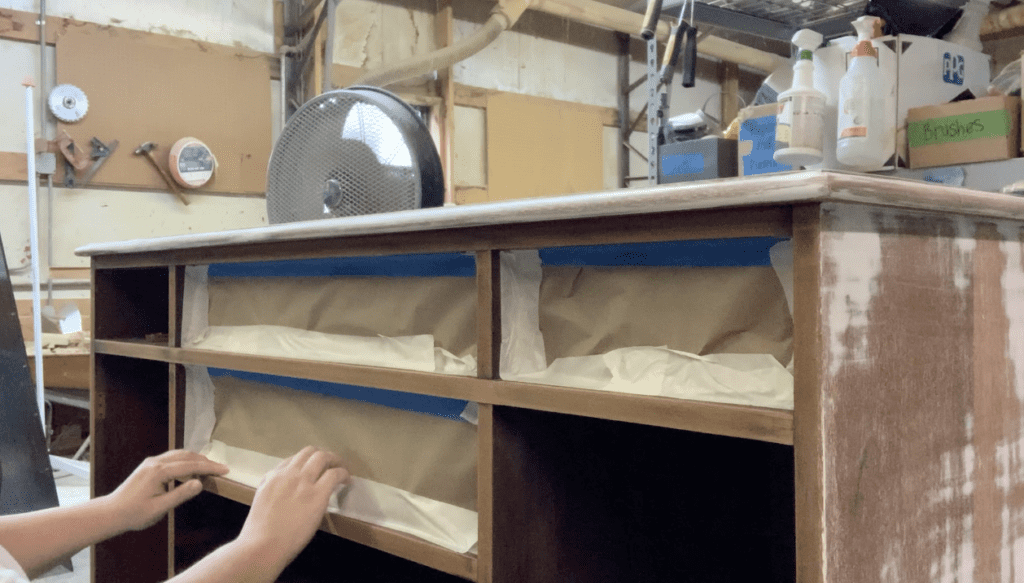
Fourth: Masking
I masked all of drawer openings in the cabinet body as well as the drawers themselves. This keeps everything clean and tidy when spraying. Also keeps dust from blowing everywhere when I spray the body. A 3M Hand Masker is the perfect tool for this job!
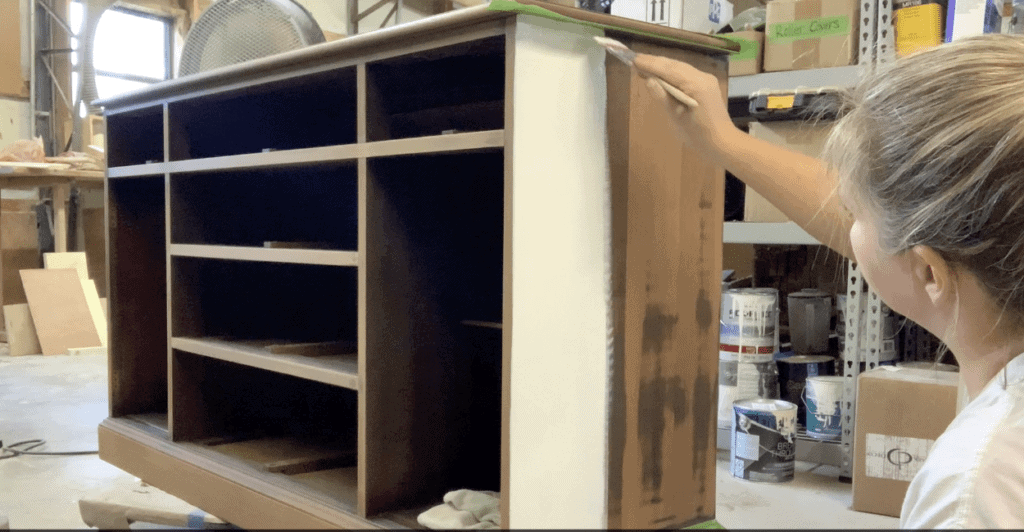
Fifth: Primer Coats 1, 2 & 3
I’m about 30 scrolls into this post and just now to the priming!
I used Fine Paints of Europe oil undercoat primer (I had them tint it to my actual paint color – color code G20010) on this china cabinet. By the way, if you’d like to download a free copy of all the tools, supplies and paints I use on furniture, you can do that right here!
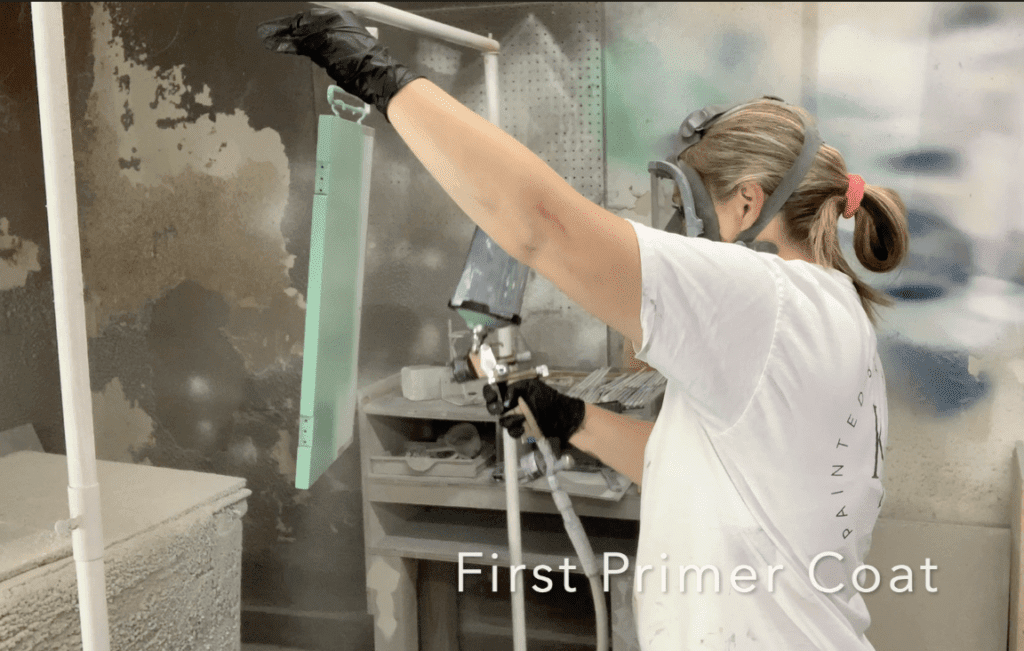
My spray gun is a SATAjet x5500 – it’s linked in The Glossy Furniture Guide (free download!)
When the first coat of primer was dry, I sanded every single inch of the entire china cabinet using 400 grit sandpaper all by hand using sanding blocks. No electric sander.
And then I primed it a second time.
After the second coat of primer was dry, I sanded the whole cabinet again using 600 grit paper. Yes, all by hand.
And then, I primed it a third and final time. And you guessed it…I sanded every inch of it one last time. The final sand was done with 800 grit. All by hand with sanding blocks.
Sounds so crazy doesn’t it? It IS crazy! But multiple coats of primer with sanding in between is the way to achieve the best reflective look in high gloss paint.
Sixth: Building A Temporary Paint Booth
When using high gloss paint, dust is the main enemy. Every dadgum dust particle that lands in the paint as its drying will be seen. In efforts to cut down on the amount of dust in the air, I build a temporary paint booth out of plastic.
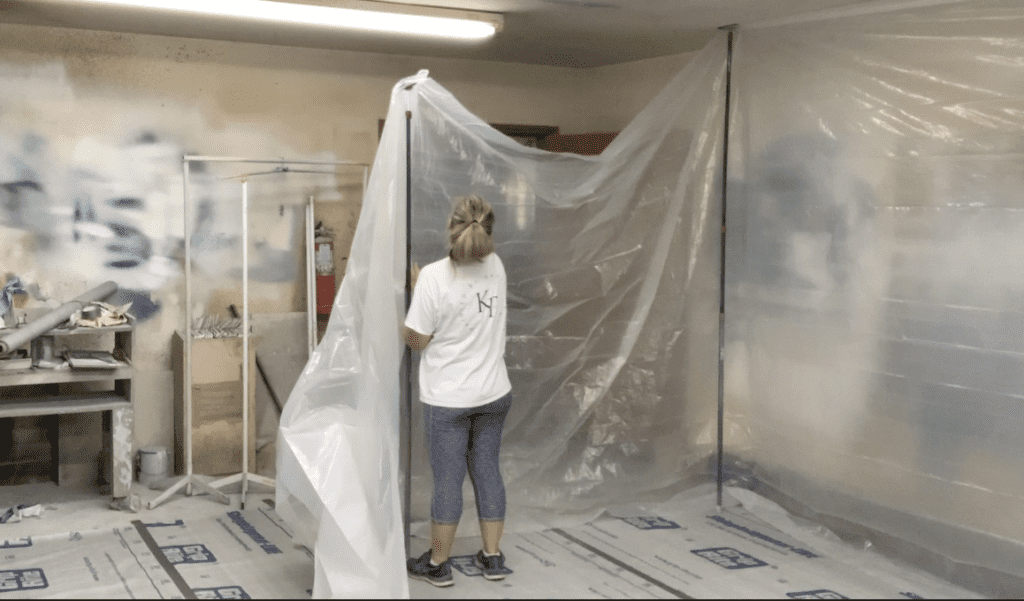
How to build a temporary spray booth out of plastic:
- Cover the floor with shingle underlayment
- Attach 3mil plastic sheeting with Zip Wall pole system
- Install tarp zipper for entrance/exit
You can watch me build this plastic paint booth in this YouTube video!
Seventh: Paint
Once the paint booth was constructed, I carefully loaded the china cabinet into it and wiped it all down for a final cleaning. Then I sprayed it with Fine Paints of Europe Hollandlac Brilliant oil base enamel with my SATAjet x5500 RP gun with 1.3 I fluid nozzle. Again, the color code is G20010 (sorry, wish it had a fun and memorable name instead of just a code number!)
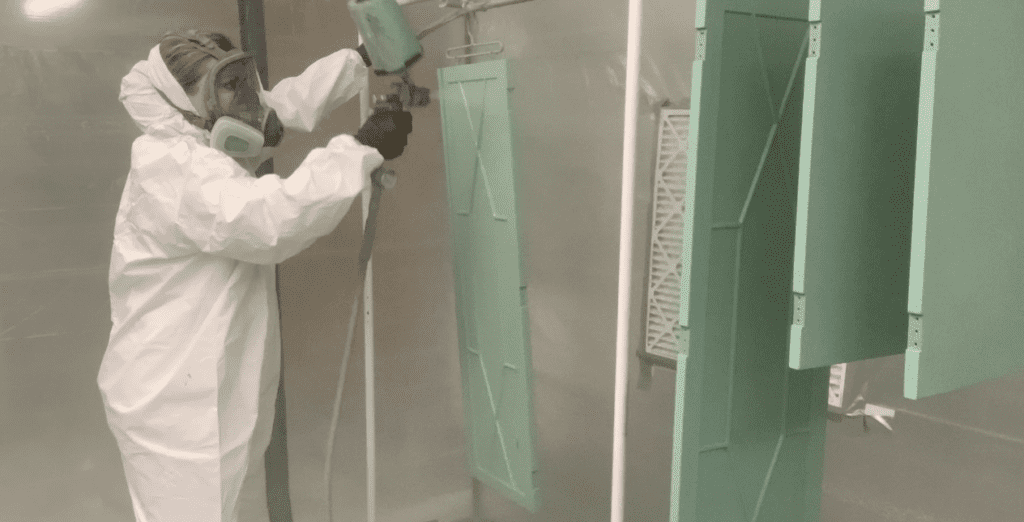
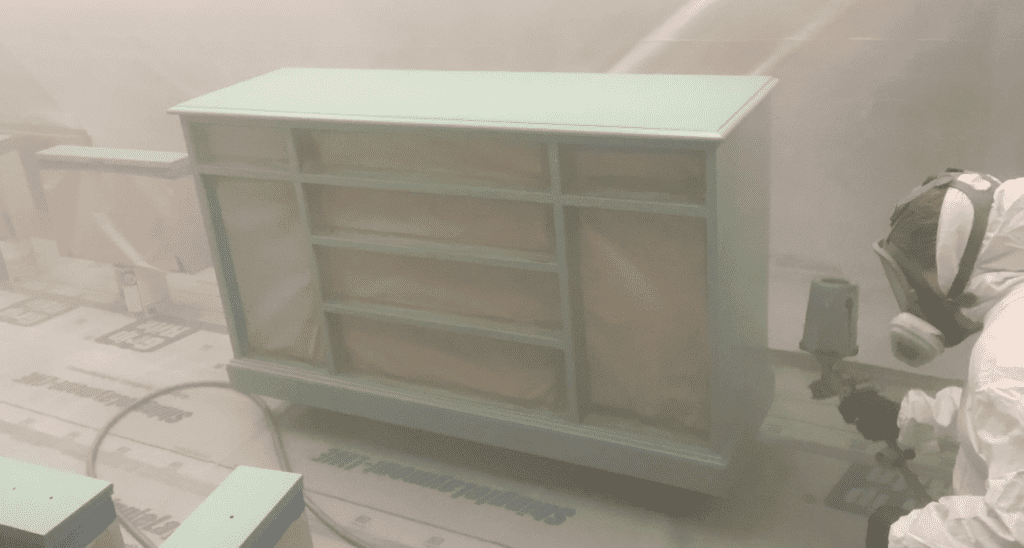
Since I had built up the substrate with three coats of primer in the color of the paint, I was able to get by with only spraying one coat of finish paint on the cabinet. This only worked because 1) the primer was built up to perfection and 2) because the primer was tinted to the exact color of the final paint.
We are getting close now!
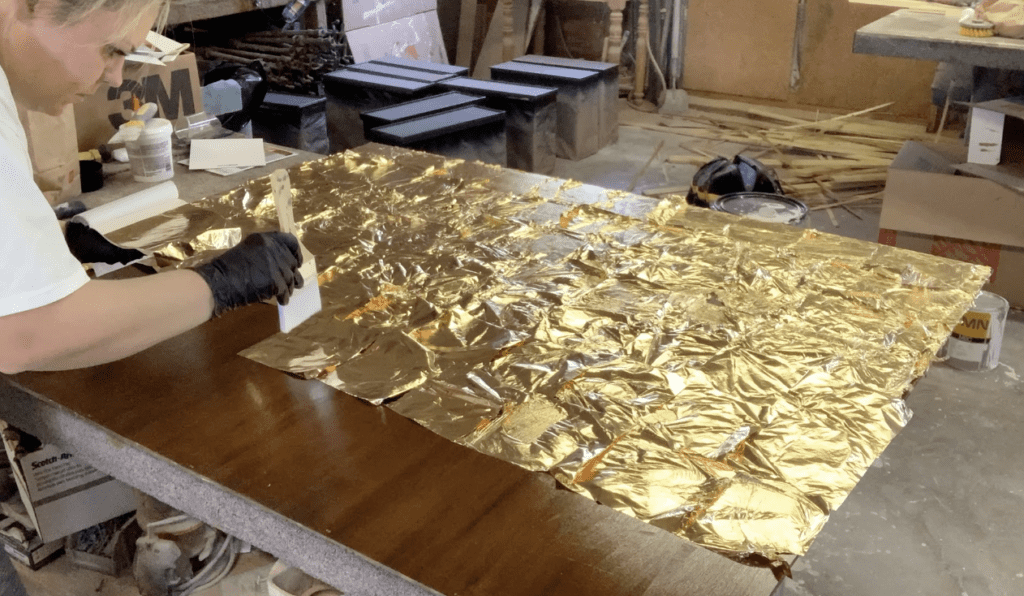
Eighth: Gold Leafing the Inside
This was my first time to gold leaf anything. My takeaway was this: it’s harder than I expected it would be!
I’m no pro, but this is what I did:
- Cleaned off the surface
- Applied gold leaf adhesive in thin layer with brush
- Let glue dry to clear and was tacky to the touch
- Carefully applied gold leaf sheets overlapping edges slightly
- Once surface was fully covered, lightly brushed gold leaf sheets to adhere
- Kept brushing until all excess was gone

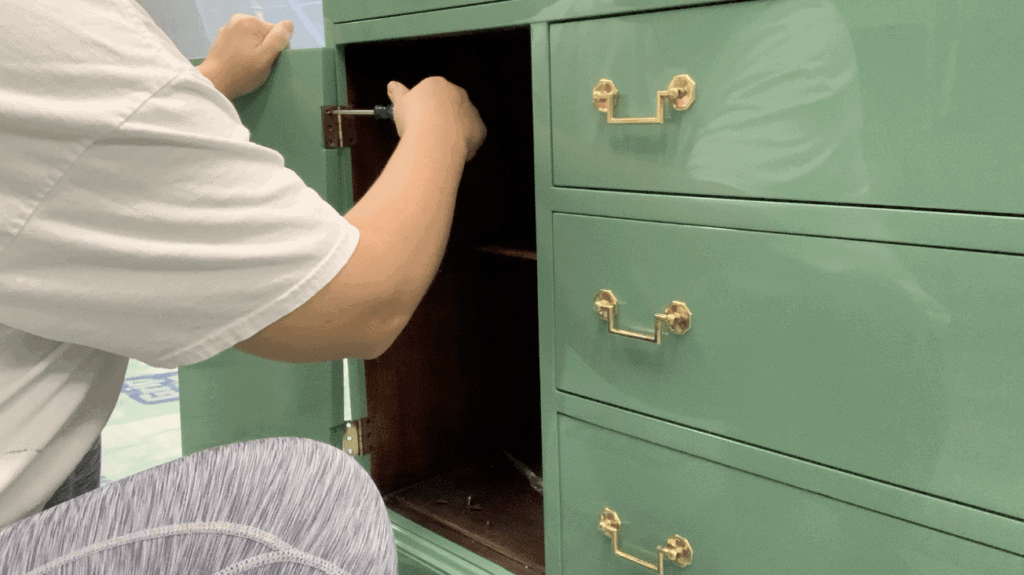
Ninth: Reassembly
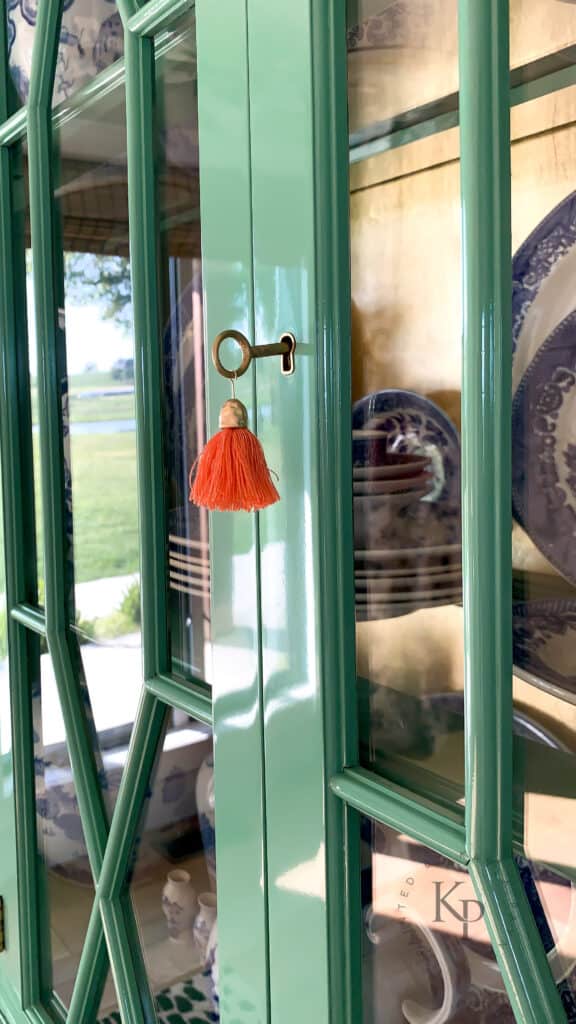
After the paint dried overnight, I carefully removed all of the tape and masking, reattached the new hardware and reassembled the china cabinet. This piece was so easy to put back together because I took the time to label every single item that was taken off!
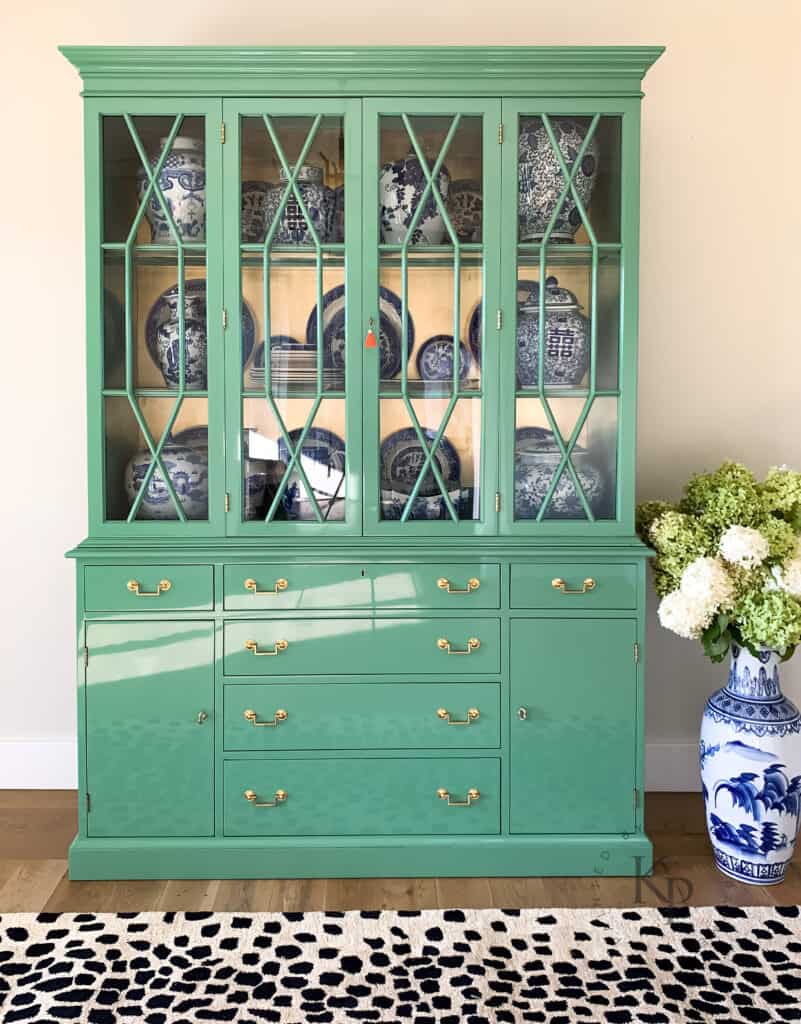
Finally: The Final Product
After all of that work, I was so happy to be finished! And I’m in love with the final result. What do you think of this china cabinet makeover?

A beast of a cabinet… it would have given me a workout.😉 This is absolutley stunning Kayla!
Thanks Denise!! Xo
I’m exhausted just reading this! Wow!!! You are amazing…and this piece is gorgeous.👏🥰
Thank you!
When I grow up, I want to paint amazing finishes with a spray gun like you. You always knock your furniture makeovers out of the park. Well done, my friend. Thanks for including me in your furniture flipping tour. See you next month! 😘
Love you, Do!
Kayla, You’ve struck “gold”. Beautiful piece. I love the pulls! Would you mind sharing the source?
Thanks! They’re from VanDykes Restores. Search for “brass chippendale furniture pulls”
I love this so much. The high gloss and color make it work with so many different styles. Beautiful.
❤️❤️❤️
Your artistry is incredible. This piece has been transformed and is simply stunning!!!!
Thank you!! xo
Who makes the rug featured with the cabinet?
It’s by Erin Gates and bought it off of Chairish!
The gloss! The gold leaf! A lot of work with a gorgeous result.
Thank you! xoxo
Incredible! The finished shine, the detailed prep, the color, the love!
Thanks Linda! xo
I am in love! The cabinet looks amazing- I would love to try this but I think it’s so many steps I may lose my patience.
Do you sell your finished items?
Curious……
Hi Shaunna, I sell on Etsy! This cabinet is available in my store here. https://www.etsy.com/listing/1280371906/
First time I’ve seen your name and I was intrigued by the before picture, so I read….not watched….your detailed post. I’m quite impressed by your intense labor of love dedication! It came out beautiful and I like the color, but…..I don’t have the time nor patience to do all that you did to achieve the final look, which is okay. I prefer a softer and more velvety matte finish, probably because it’s more traditional than modern, read “I’m old” here, but I can appreciate other paints and finishes, just the same. Thank you for sharing what you love to do.
Thank you so much Sharon! xo
Kayla this is Just beautiful! I have painted a China cabinet similar to this and they are a lot of work but you really made it look spectacular! You taught me tricks with scotch h tape and building a spray booth (which I have been dying to try). On smaller projects I slip copy paper under the grid and secure with tape! Love watching you work !
Thanks Karen! xo
Kayla, thanks so very much for documenting all of the steps in such an easy-to-follow guide! As with everything you do, this cabinet is practically perfect!
Thank you my friend!!! xo
Absolutely stunning. I am beyond impressed. Flawless.
Wow! Not the Color I would choose for my cabinet….such a wonderful job!!! You have given me so much inspiration for my dining room cabinet…just a different Color! Thank you so much!
Wow, what an tremendous project with an awesome outcome! Congrats on having such a perfect finish on this cabinet, it almost looks like metal now.
I appreciate some of the insightful tips for those hoping to do any kind of cabinet/furniture painting. Especially the cleaning with TSP before sanding, seems to be an often overlooked step that is critical for a quality long term finish.
Hopefully you find a buyer for this masterpiece!
Thanks so much, Jacob! xo
Wow! Gorgeous finish. Love the gold leaf. Here’s a side note: friend, who was an actual designer, used gold wrapping paper and tore it into random pieces, then “papered” his bathroom. It looks awesome!!!!! I was surprised when he confessed it wasn’t real gold leaf. Jd
Thank you for this detailed write up. What a phenomenal job you did. Would you mind sharing where you got the hardware? What a difference it makes!
What an absolutely stunning job! It reminds me of the beautiful lacquer finishes on traditional Chinese furniture . Nicely done!
Thank you for this perfect guide. It’s all useful to all homeowners like me who like to do things like this. I am a housewife, yet I love doing men’s duties like this.
What a great job.
How did you get the perfect reflection? I’m just starting out using a spray painter. Did you dilute and if so with?
AB
SO
LOOT
LEE
S T U N N I N G !!!
You, Madame, are a Rock Star.
I’m late to this party. But your craftmanship is second to none. Your painstaking labor paid off in a huge way.
Also, I love the comment from someone that says his friend tore gold wrapping paper up and used it in his bathroom. Great idea there too.
Fantastic piece. Very inspiring.