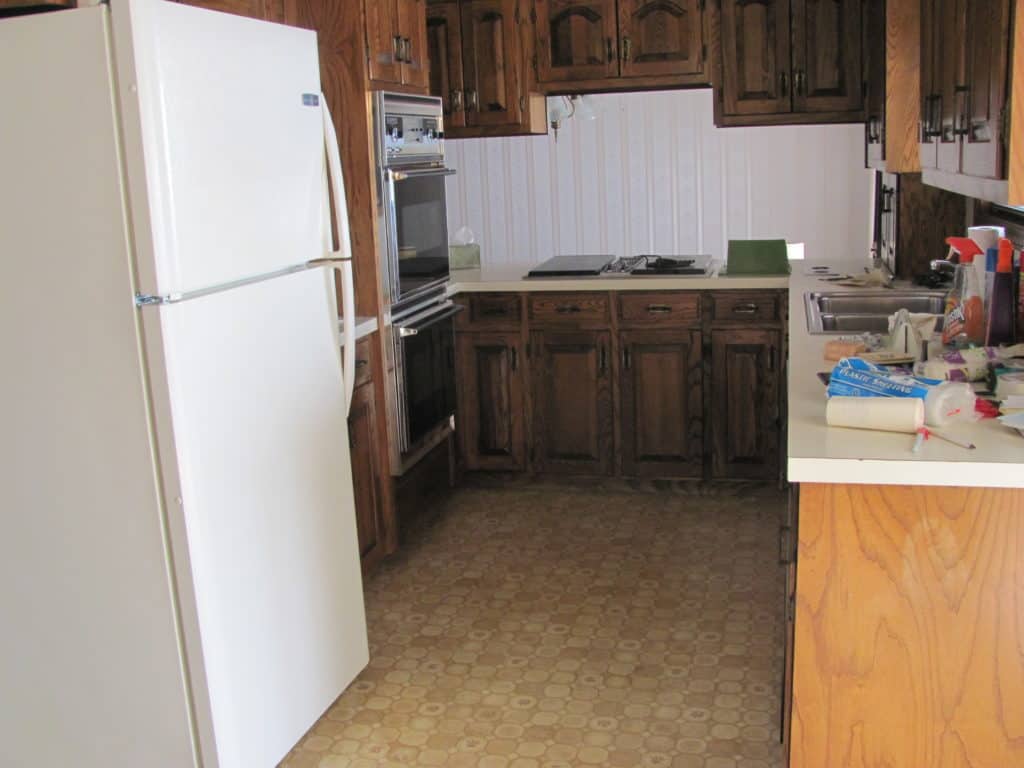
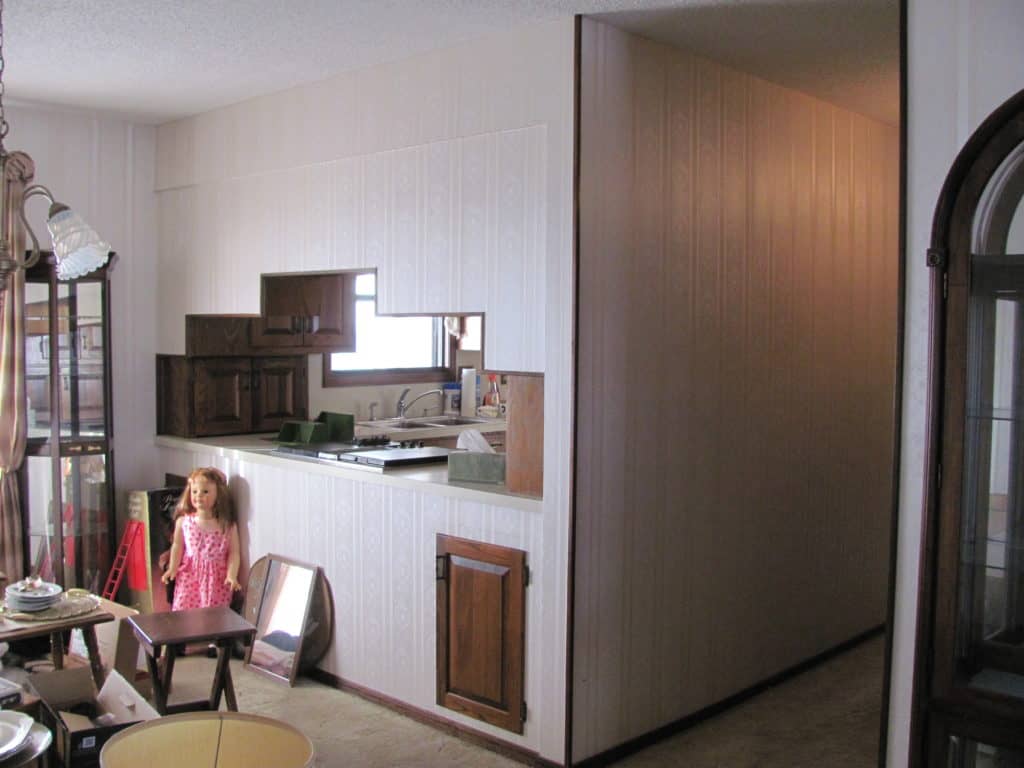
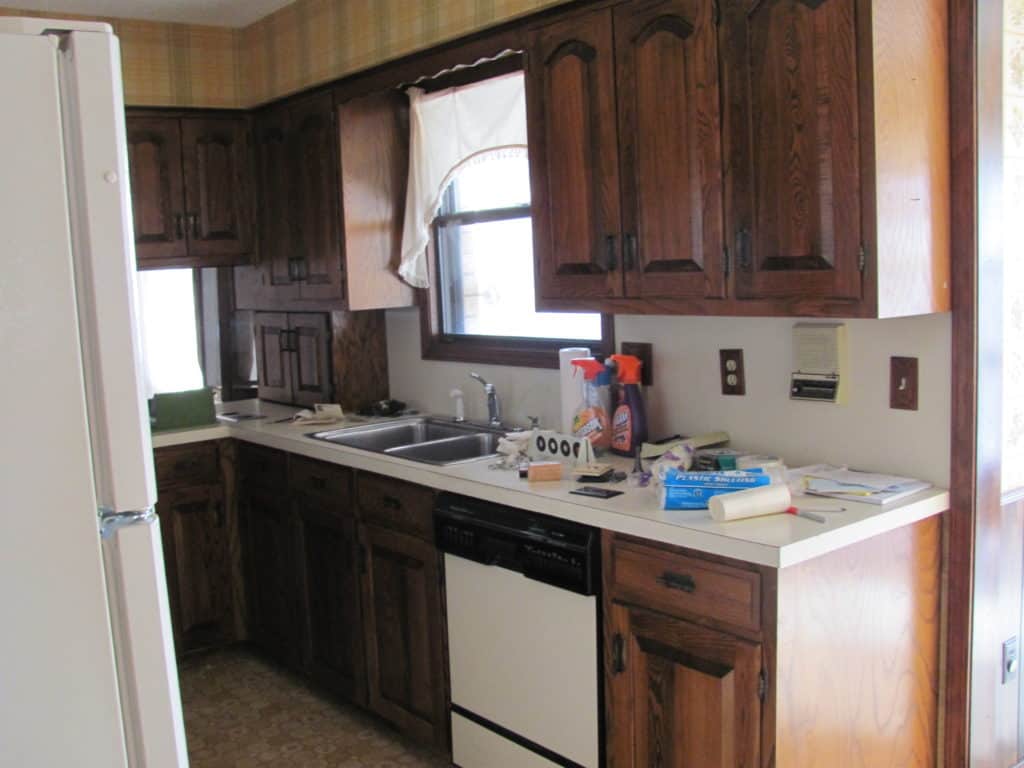
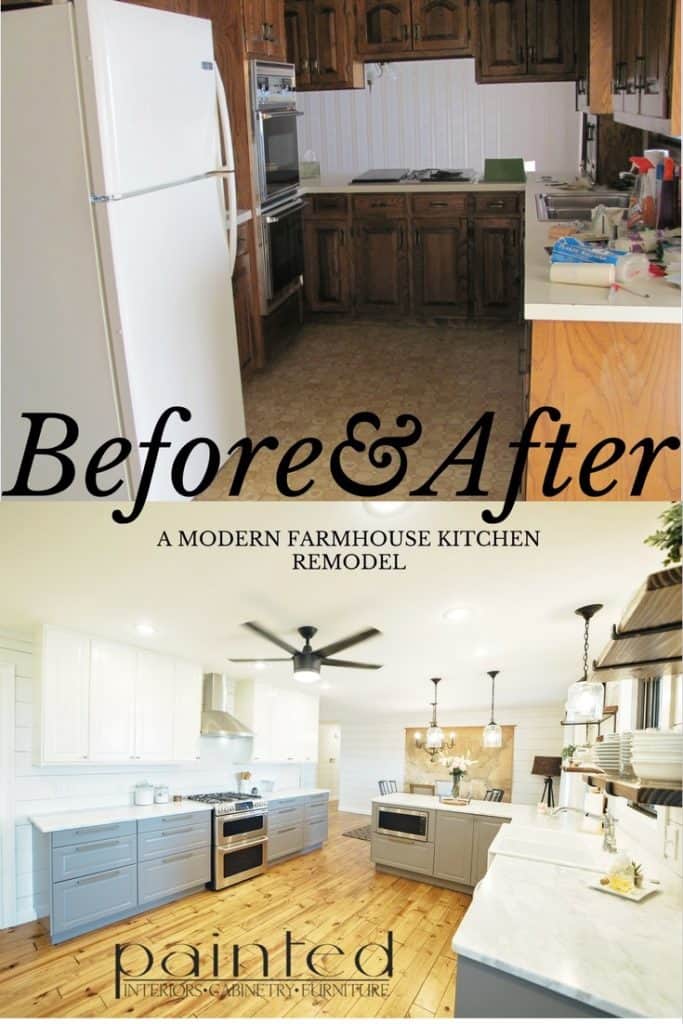
We have been working at a breakneck speed to complete our home remodel in order to list it for sale before the end of summer. My previous two posts were of the beginning stages of our kitchen remodel. If you’d like to check those out, you can click here and here. I really had intentions of blogging about the installation of our IKEA cabinets, but you guys, I am just. so. tired.
We installed the cabinets in the summer of 2015 and here it is the end of the summer 2016. There’s just a lot that I didn’t properly document because I didn’t have this blog back then. In a nutshell though, it went like this.
I designed the kitchen layout in the handy tool on IKEA’s website. We traveled to the nearest IKEA (3+ hours away). We spent an entire day at the store buying the cabinetry. It was our first IKEA trip so we were sure to block off an entire day to spend just looking around in amazement! When we got the kitchen home, I spent several weeks assembling the boxes and hanging them up.
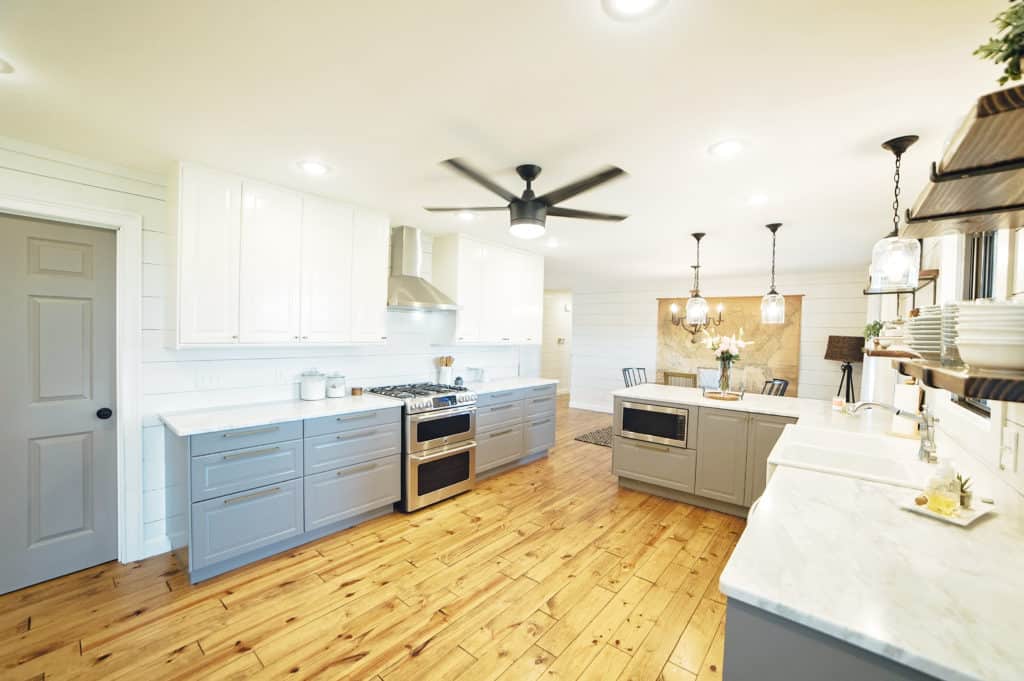
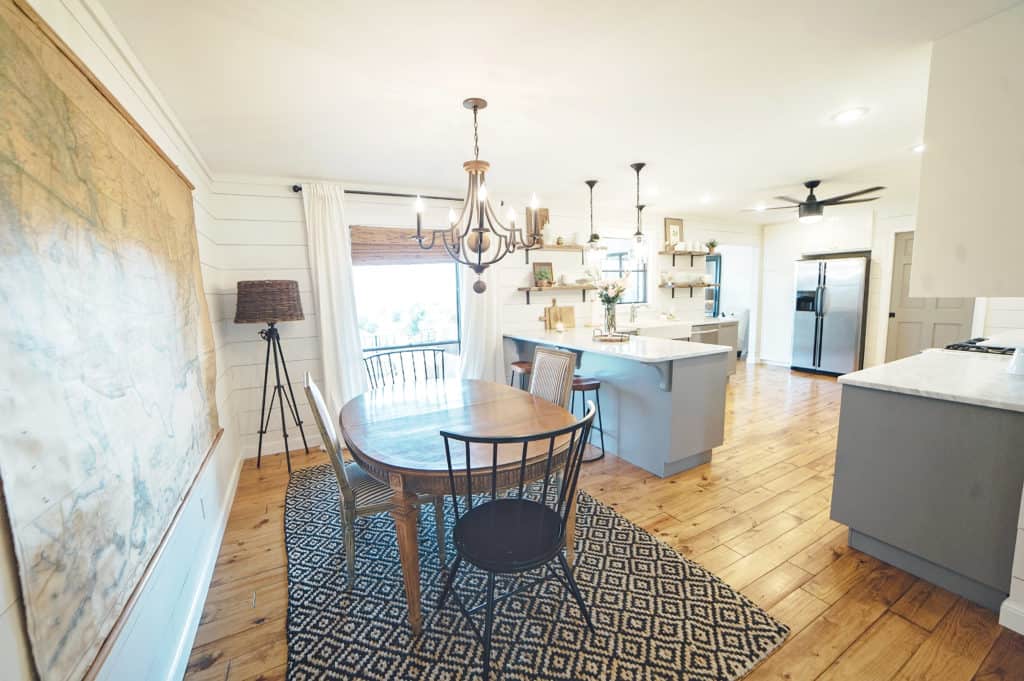
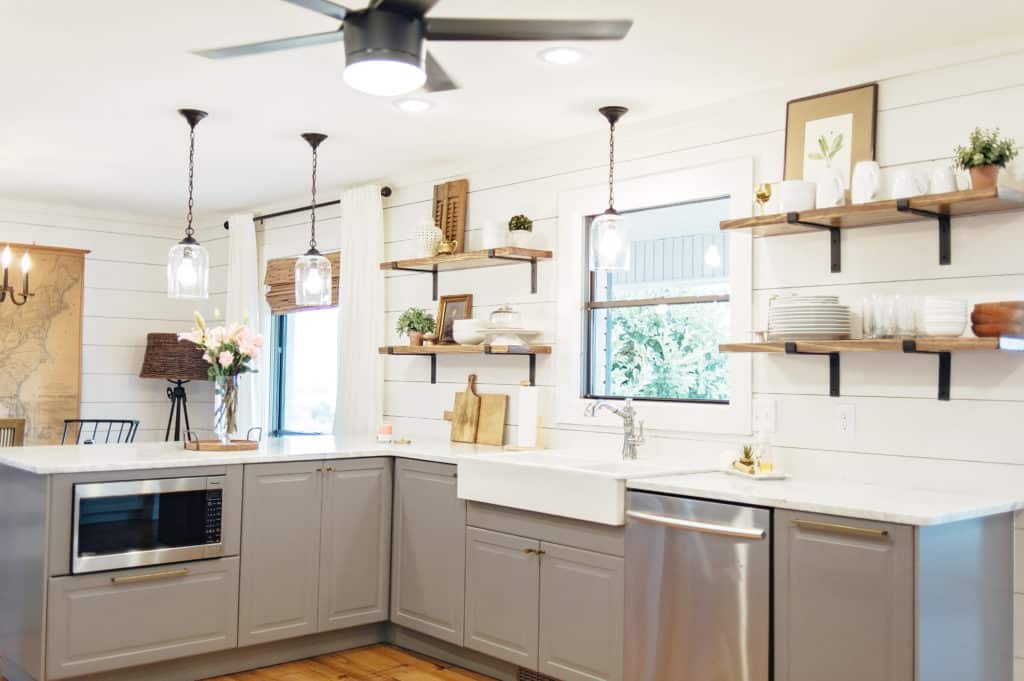
Long story short, I love our IKEA kitchen! If you want to read an awesomely informative blog post about IKEA cabinet installation, I recommend checking out Chris Loves Julia, search their site for IKEA kitchen.
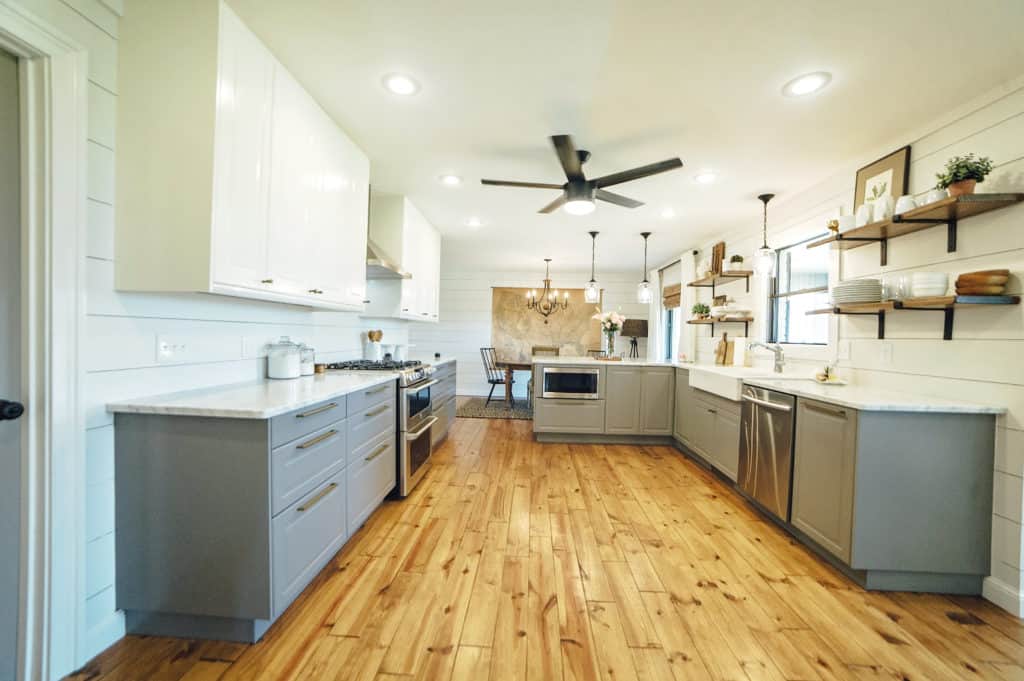
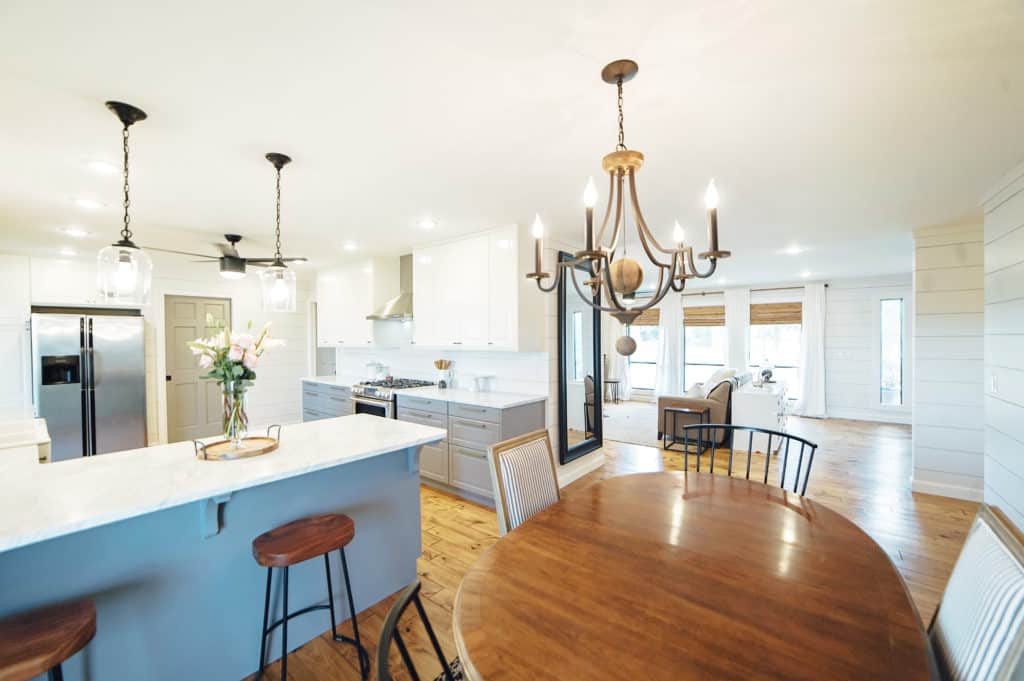
Alright ya’ll, let’s look at some before and afters, shall we?
Sources linked at end of post:)
*Some links are affiliates*
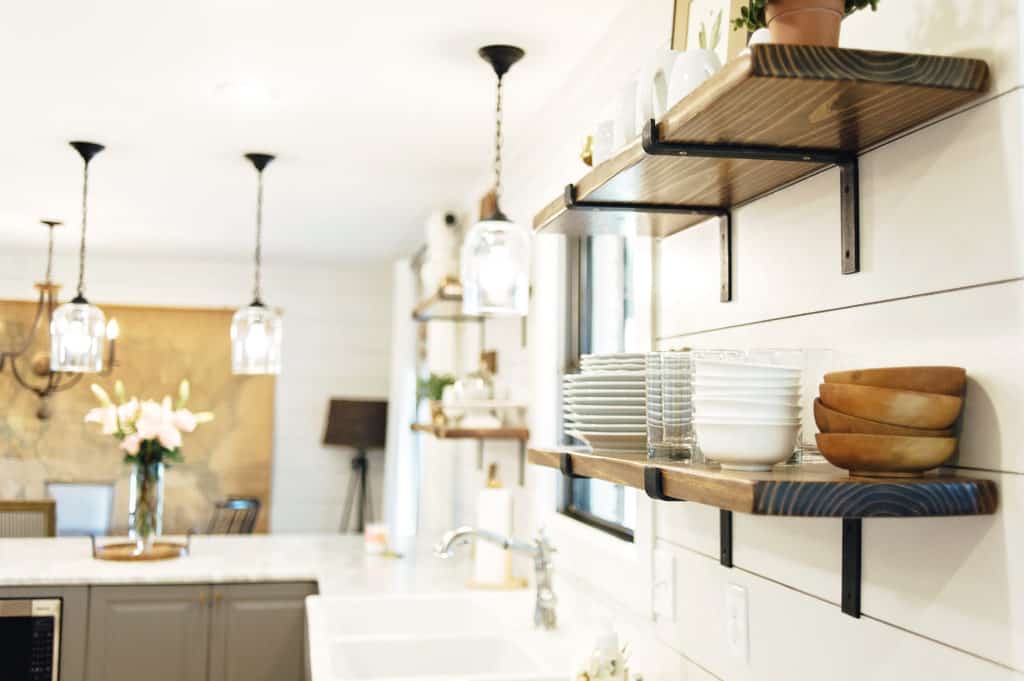
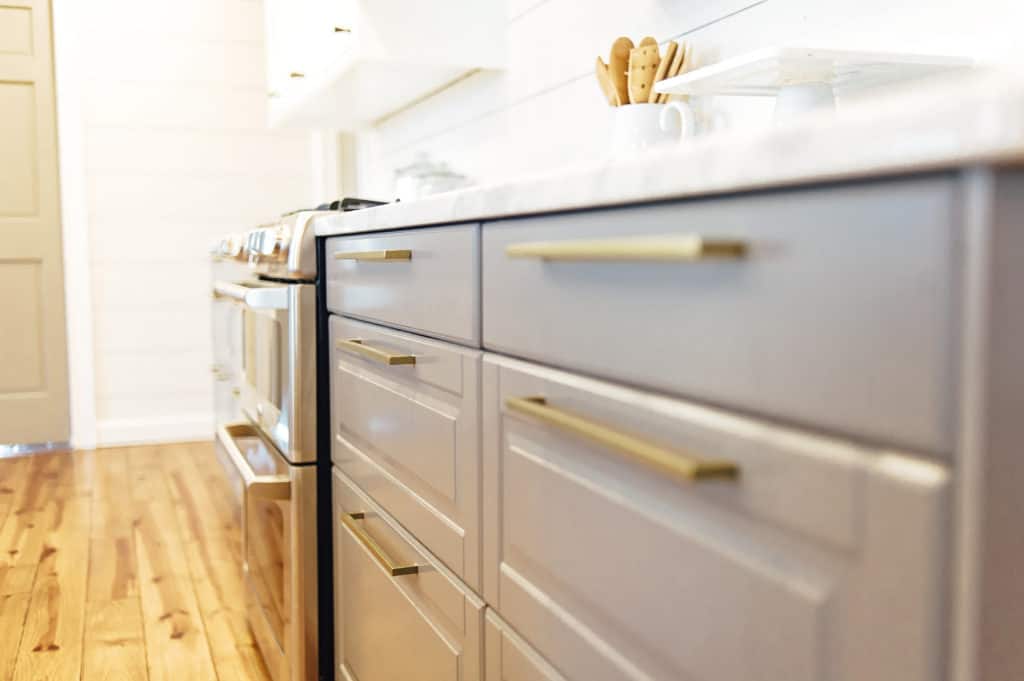
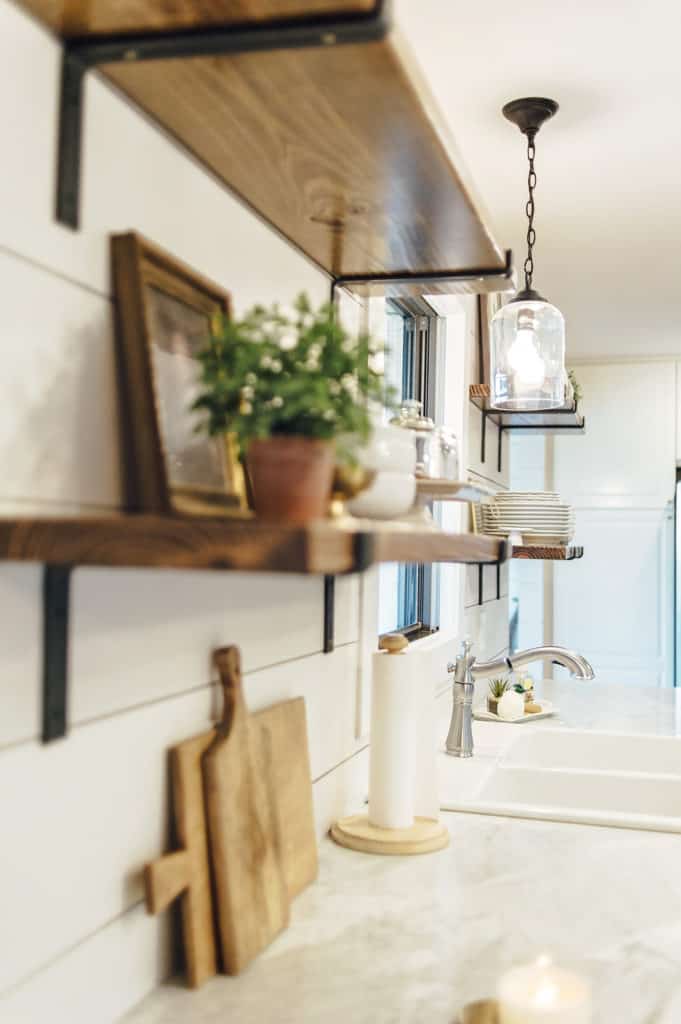
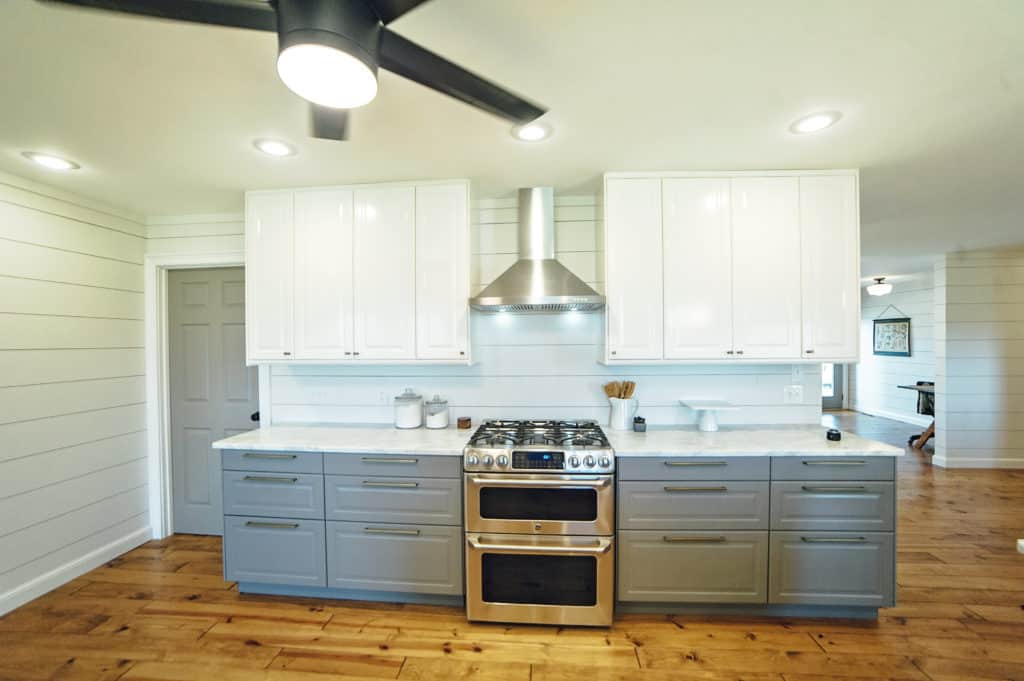
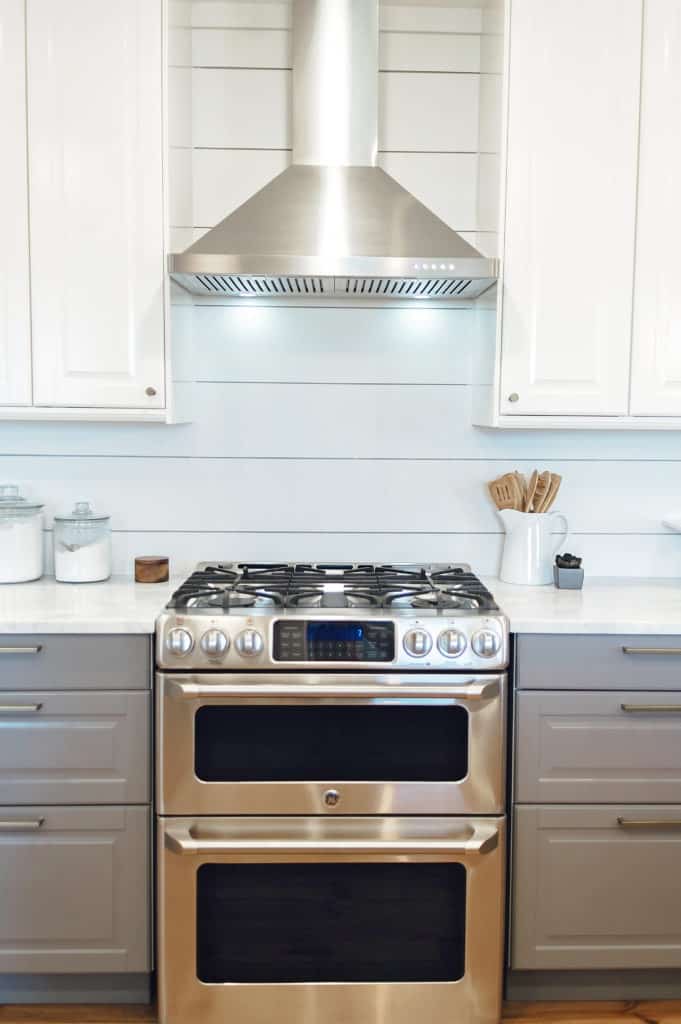
Cabinets: IKEA Bodbyn in gray and white
Flooring: Solid pine with Minwax Early American stain and Satin polyurethane
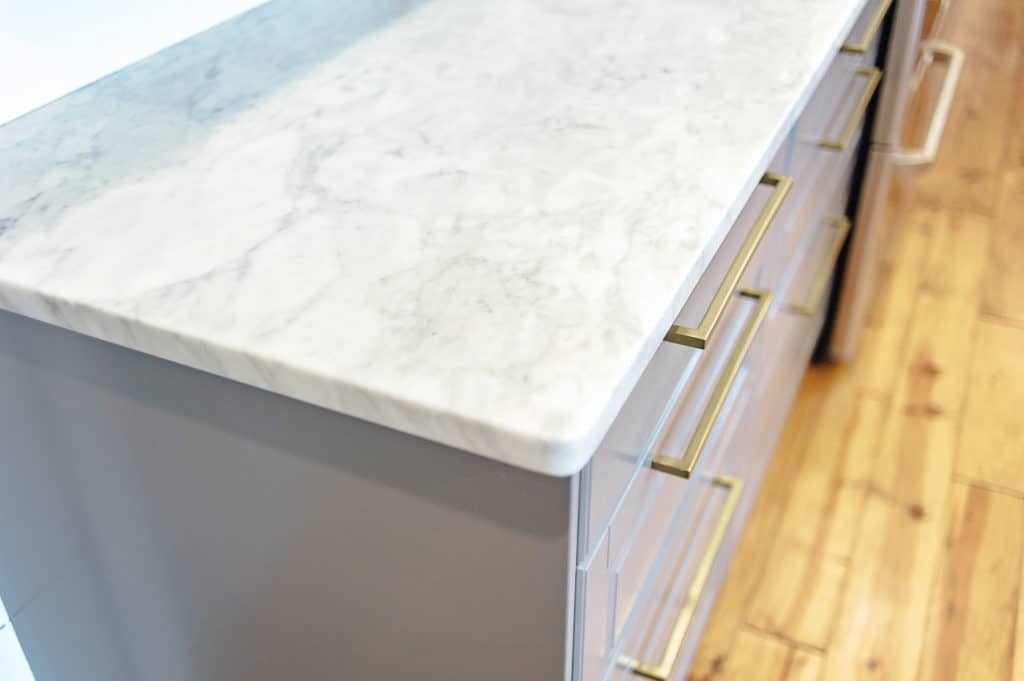
Countertop: Carrara Marble
Fan: Home Decorator’s Collection
Sink: IKEA
Drawer Hardware: Atlas Homewares – Successi in Vintage Brass
Cabinet Door Knobs: Anthropologie Marcio knob
Pendant light fixtures: Joss and Main
Shelf Brackets: ETSY seller DirtFrogFurniture
Wood Shelves: Pine 2″x12″ boards from Home Depot and cut to size. Stained in Mixwax Special Walnut
Wall Color: Sherwin Williams Origami White
Trim color: Sherwin Williams Snowbound
Interior Door color: Sherwin Williams Pavestone
Range: GE Cafe series double oven
Range Hood: Cosmo
All “after” photos taken by Lacy Tomlinson
Wow, KP! Catching up on a few posts I missed – but this is absolutely gorgeous!!! It’s modern, but classic and the styling is just perfect. I need a one-on-one consult with you whenever we decide to update our kitchen, because your taste is impeccable! I realize your photographer’s lens is probably playing some tricks – but everything looks twice as big as the original space! Amazing.
Any updates on your next fixer upper?
OMG Kayla what a stunning after. I told you that you are the JoJo of Arkansas minus the chippy furniture 😀 It looks so clean, crisp, polished & casual. I love it so much!!
Hello
I wanted to ask you how you feel about your marble countertops now that you have had them a bit? Would you still make the same choice and have you had issues with etching and staining?
Hi Ashley, all great questions!! Let me start by saying, I’ve loved the look of marble countertops for so long!!! When we bought this house, we knew we would be renovating it to re-sell eventually. My thought process was, “I will install Carrara Marble in this kitchen and it will be a good test drive to see if I will want this counter top in my someday forever house”. That was my whole mindset in choosing this countertop material. I just knew I HAD to have it or I wouldn’t be able to ever stop thinking about it! I did a ton of research on it, and I’m pretty sure I read every blogger’s review on their marble lol! We’ve had our marble for a year now and this is my take on it. I really do love it so much. There’s just nothing out there that can compare to the look, feel and depth of real marble. Yes, there are some decent looking Quartz lookalikes out there now….but still nothing compares to the beauty of the real thing (just in my opinion). I have not had any trouble with staining. I have put a granite/marble sealer on it a couple times and it DOES help. I do have etches on it here and there. Yogurt, water rings, some kind of goopy, sour candy my kids had, salsa spills at the bar (also the kids) etc….all have left little etches here and there. Oh by the way, my marble is honed…I would never recommend polished. Anyway, the etches really don’t bother me that badly! They can only be seen at a certain angle and if the light is hitting it just right. And I knew exactly what I was getting into when I chose marble. I knew it would etch and I EXPECTED it to and I think therein lies the difference between someone who will love marble and someone who will hate it. If you KNOW it will etch and possibly stain and you’re okay with that, then choose marble. If you cannot be ok with the etching, then by all means, please choose a Quartz lookalike! Would I choose it again, yes I would:) Sorry for the novel I’ve written but I hope this will help you a little bit! Thanks for your comment xo
Kayla thank you so much for the response. I am absolutely in LOVE with carrara and I feel the exact same way you do because hands down nothing compares! I do belive that I could deal with the etching convincing my obsessive compulsive husband on the other hand is another story lol. I plan to work on him for the next few months and hopefully by the time we are ready to pull the trigger on our kitchen he will cave! What you have done in this kitchen is absolutely amazing, great job!
Perfection. Our Ikea cabinets get delivered Saturday, so we are at the beginning of this process. Our set up is similar to yours in lots of ways……this post is giving me light at the end of the tunnel! Great job with everything!
Thanks! Good luck with your kitchen!! If you post on social media, tag me as I’d love to see it!! xo
Do you know what length your cabinet pulls are? Hardware has been one of the surprisingly hard things to figure out! I like the size of yours 🙂
I found your blog searching for reviews of the GE Cafe range on Pinterest. Im considering the same one for our kitchen remodel. How have you liked it so far? Also, I am having trouble deciding whether I should just get a GE vent hood so the stainless matches but Im not too thrilled with their options. I see you got a different brand. Do they look the same? I just worry if the stainless on the range and hood are different, the perfectionist in me will cringe every time I am in the kitchen! Beautiful kitchen by the way! Thanks so much for your help. 🙂
Hi Carolyn! Great question. I worried about this same thing too. The two different stainless steel pieces look the same. You’d never know they were different brands!! Hope this will help your decision:) xo
did you get the wax/oil rub or the raw steel brackets? also what size did you get… the 1 inch, 1.5 inch? love them!!!
Hi Natasha, the steel came oiled from the fabricator and I believe they were 1.5″. We have since sold the house or I would measure to be sure for you. But I’m pretty confident they were 1.5!
You have a beautiful kitchen. Sorry if it’s been mentioned before but could you tell me what shiplap material you used behind your stove?
Hi Kara, I don’t think I ever did mention it! We bought 4’x8′ sheets of 1/4″ lauan from Home Depot and ripped them into 8″ strips on a table saw. Then we nailed them onto the walls using two nickels stacked together as spacers between the boards. Hope this helps! xo
Beautiful! Did you paint in between the boards a different color or is it all the same color? Do you remember if you used a brush or a roller?
Hi! I really like your kitchen. Could you please tell me, where did you buy this beautiful lamp above the table?
Hey, I was wondering how you built in your microwave! We are planning on using IKEA cabinets, but we are trying to figure out how to make the microwave work… we don’t want to buy a super expensive built-in one. It doesn’t look like you used the microwave base cabinet. What base cabinet did you use and how did you trim it out? Thanks!